How Energy Codes Influence Metal Roof Panel Selection

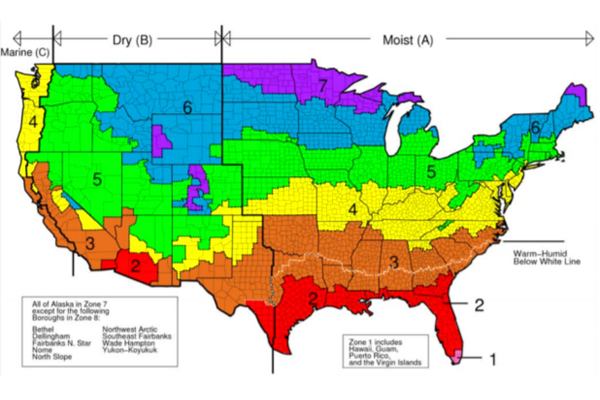
On a very basic level, specifiers can look at a climate zone map and get an idea of the metal roof panel best suited to a specific geographic region. The issue, however, is actually much more complex. One must know that overlooking any detail could result, not only in less-than-ideal performance, but also in costly project fail, often related to the project not meeting required energy codes or other standards. With this in mind, an important initial question to consider is how to select metal roof panels that conform to new and fast-changing energy codes and their designated climate zones.

To begin making wise considerations, the architect must know what codes are in play. For instance, is it IECC or ASHRAE 90.1? Which year of the code/standard? Are there additional local code requirements? Even if a state adopts a particular energy code, it doesn’t necessarily mean that all jurisdictions will adopt the code at the same time. Along with this, some local jurisdictions may have their own or additional requirements. To be successful, it is imperative to know what the regional project goals and requirements are. This will require research prior to specifying the metal roof panel and its assembly.

Using IECC and ASHRAE 90.1 for Energy Code Compliance

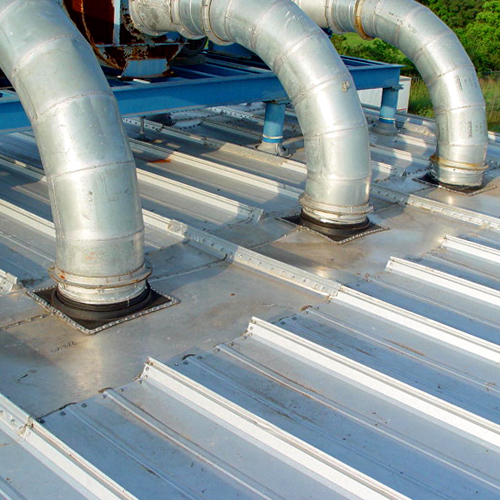
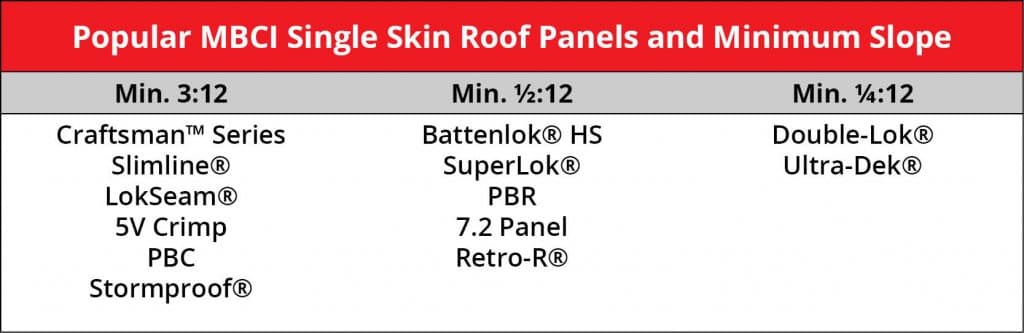
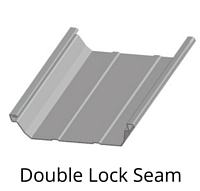
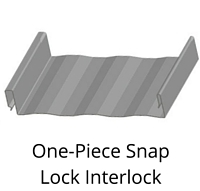
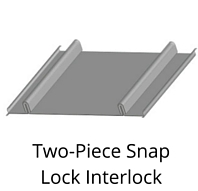
Three of the basic metal building roof panel types are single-skin standing seam, screw-down and insulated metal panels (IMPs). When using the tables in IECC and ASHRAE 90.1 for metal building roofs it must be remembered that these tables are based on single-skin standing seam roof panels and purlins that are 5′ on center. The tables provide the required R-values and/or U-factors based on climate zones, along with other assembly requirements noted with each tables. In the Appendix of some versions of ASHRAE 90.1, there are allowances for modified roof assemblies, including screw-down metal roofs.

Energy Code
DOE-Developed Climate Zone Map

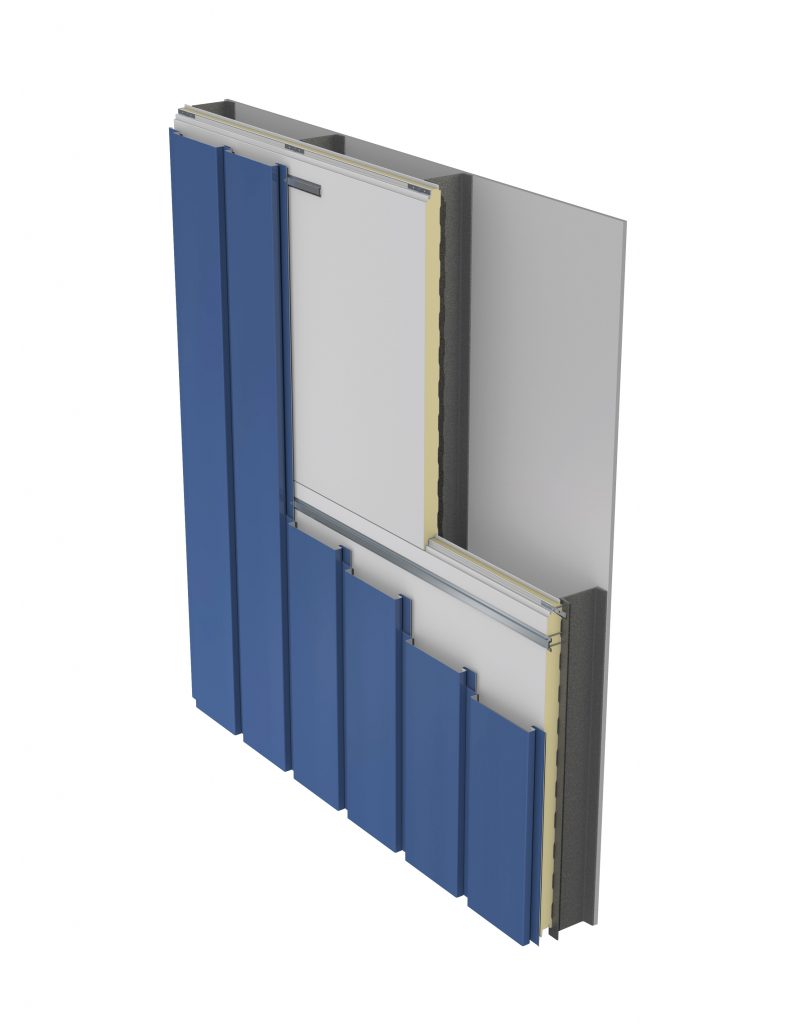
Often, in certain climate zones, the required R-values and U-factors may be so stringent that the logical first consideration is to use insulated metal panels. IMPs are a great choice for offering high insulation properties in a top-of-the-line product and the R-values and U-factors are readily available for use in compliance calculations.

Keep in mind when deviating from the prescribed assemblies in IECC and ASHRAE 90.1, calculations will be required to show compliance, along with modeling and/or the use of approved compliance software, such as COMcheck.

Making Informed Decisions

Selecting the right metal roof panel is an important step to achieving energy code compliance. Even though energy codes can be complex and are constantly evolving, by making informed metal roof panel selections you will add to the overall success of your project.


Top Five Tips:

  • Know your code. Find out what energy code is required for your project.
  • Know your zone. Requirements vary by climate zone. Identify your project’s climate zone.
  • Understand your options. Deviating from specified assemblies will require approved proof of compliance.
  • Choose wisely. Research the properties and assembly requirements of any metal roof panel. Use this information in conjunction with energy code requirements to make wise choices.
  • Call with questions. Call the manufacturer with questions before you get too far down the road.

The Case for Day One Weathertightness Warranties

Once upon a time, a “standard warranty” was indeed the industry standard for weather tightness warranties in the metal roofing realm. To make a long story short, this meant that manufacturers supplied a “manufacturer’s standard warranty” based on an initial review of the details to ensure that the roof could be properly installed but left it up to others to ensure that the details were followed. If the roof was not properly installed and resulted in a leak then the manufacturer’s warranty did not cover it. At this point, the project had been closed out and the installer was long gone, sometimes even out of business. The owner, architect, general contractor, installer and manufacturer were then at odds with each other leading to dissatisfaction and frustration all around.

Warranty Evolution

In the mid ’90s, the Single Source or Day One warranty was born and quickly caught on throughout the metal roofing industry. Generally, this warranty required that the roofing contractor come to the manufacturer’s training course to be trained in the proper installation of their roof system(s). In addition, the manufacturer typically required inspections at the beginning, middle of the roof installation with a final inspection just before the crew demobilized from the project. Once the warranty was issued, the manufacturer was responsible to the building owner from the date of substantial completion for the weathertightness of the roof. To be sure, there are still terms and conditions to the warranty, just like with any type of product warranty. For instance, the warranties don’t cover leaks caused by natural disasters or damage caused by other trades on the roof. These warranties provide very good coverage and the best part is that the inspections greatly reduce the chance of a leak in the first place, which is what any building owner would want.

Warranties
Chain of Lakes Elementary School featuring Hunter Green SuperLok® Metal Panels

There is an overwhelming agreement on all sides that the evolution toward the Day One warranty has been a good thing for the industry. It has forced installers to do things right from the outset and has compelled manufacturers to come up with good, clear details for some of the more complex architectural elements that architects want to use such as dormers, hips, etc.

Conclusion

Manufacturers all want their roof installations to go smoothly, to look good, be trouble-free and perform as expected for many years. To that end, they are willing to work with specifiers, roofing contractors and others to provide assistance, training and job specific help as needed. To ensure that the roofs are properly installed, the specifiers and contractors need to work together with the manufacturers to ensure good communication about the requirements for the specific project and what each party needs to make the project successful.

Tips for Installing Metal Roof Curbs

Metal roofs made from galvalume-coated steel provide great corrosion resistance and can readily satisfy a 20-year weather-tightness warranty. However, when a large penetration in the roof is needed, such as a large exhaust fan or other equipment, the integrity of the roof can be compromised if not addressed properly. The common method of dealing with large penetrations (i.e., spanning over one or more standing seams) is to install roof curbs that form the transition between the roof and the equipment being installed.

Of course, like most aspects of building construction, there are choices available in materials, methods, techniques, and styles of installing a roof curb. When the key objective is to provide a curb that will perform for the entire life of the standing seam roof, there are four key points to keep in mind.

Roof Curbs
Roof Curbs for Standing Seam Metal Roofs

Pick the Proper Material:

A galvalume-coated roof doesn’t mean that a galvanized steel roof curb is the best thing to use – in fact, galvanized roof curbs are known to rust, corrode, and leak, particularly along weld joints, as soon as a year after installation. Instead, a curb made from aluminum (preferred) or stainless steel should be used to prevent premature corrosion. To put any concerns about dissimilar materials and galvanic corrosion to rest, keep in mind that galvalume is approximately 80 percent aluminum by volume, so they are highly compatible.

Rusted Roof Curbs
Rusted Welds on a Galvalume Roof Curb

Use the Proper Roof Curb Type:

It is not uncommon for a roofer to choose a curb type referred to an an “over/over” curb, meaning that, after the opening is cut, the curb is installed over the roofing on both the upslope and the downslope sides. This might be the easiest to install during construction, but it will very likely create more work and callbacks when the upslope side starts to get water into or under the joint, and leaks. Instead, it is well worth taking a few extra minutes to install an “under/over” curb, which places the upslope side under the roofing in a true shingled lap between the curb and the roof. This way, the upslope edge is much more protected and less likely to leak using the same shingled condition occurring on the downslope side – all creating a properly water-shedding, weathertight condition.

Provide the Proper Water Flow Clearance:

We all know that water seeks the path of least resistance, so the key to keep water flowing down a roof is to avoid creating pockets of resistance. This is particularly true on the upslope end of a curb as well as on the two sides parallel to the slope of the roof. A curb with a minimum clearance of 12 inches between it and any other object on the upslope end will give water enough room to flow around the curb easily. Similarly, once the water reaches the two sides, at least 6 inches of free clearance is needed (i.e., without being encumbered by standing seams or other features) to allow the water to keep going and not back up to create a water head at the upslope end of the curb. Simply put, clearance means free-flowing drainage; lack of clearance can mean water buildup and leaks.

Install Roof Curbs Rib to Rib:

Installing curbs that rest in the flat, lower, panel area of metal roofing invites water tightness problems since the curb now has to be installed and sealed in the most vulnerable area – the surface where rainwater flows. Instead, coordinating the curb size with the rib spacing to provide a rib-to-rib curb eliminates fasteners down both sides of the curb in the pan of the roof panels. Placing the curb on and attaching it to the ribs also allows better transitioning from under the roofing on the upslope end to cover the roof on the downslope end. This type of curb has the added benefit of being able to be installed either during the roof installation of after the roof is finished.

Taking these four points into account in your next metal roofing project where roof curbs are required will help assure a well-installed, weathertight condition that should last just as long as the metal roofing system itself.

Roof Penetrations Made by Non-roofing Contractors

In our last two posts, we have looked at the proper ways for roofing contractors to address different types of penetrations in metal roofing in order to assure that a watertight seal is achieved from the outset, as well as over the life of the roof. But what happens when another contractor, such as a plumber, electrician, or other trade needs to penetrate the roof? How is the watertightness of the roof assured then?

Warranty Control for a Metal Roof

Most metal roofing warranties are very specific about what is included or not included should a roof leak occur. Therefore, the manufacturer’s warranty should be the first thing that is checked for a particular project to determine whether a seemingly innocent bit of work on the roof has the potential for a loss of warranty coverage. Commonly, qualified roofing contractors need to do the work and it needs to be inspected, but in some cases, supervised work may be acceptable too. Either way, any penetration installed by a trade contractor other than a roofing contractor should be fully coordinated with the architect or owner’s representative, the roofing manufacturer’s representative, the general contractor, and the roofing contractor. Once reviewed, there may be several options on how to proceed.

Guided Installation

For a single or simple penetration, say for a single small mechanical or electrical line, it may be possible to simply work with the trade contractor on the location of the penetration, review in advance that the proper materials are being used, and check the quality of the work for water tightness when complete. (Note: following the guidelines in our prior post on Pipe and Flute Penetrations will provide a good checklist of things to cover.) If everything is appropriately done, then it may be possible to have the roofing manufacturer add the new penetration to the list of items covered under the warranty.

Lightning Rod
Lightning Rod Application for Metal Panels

Coordinated Installation

In some cases, numerous penetrations may be required, such as the installation of multiple lightning rods across a roof. In this case, it might be more prudent to consider a coordinated, cooperative effort to allow each trade to do what it does best and keep the warranty in effect. Instead of an electrician being responsible for the roof penetrations and for lightning rods, let him focus on the lightning protection and wiring aspects of the work. But first, bring in a roofing contractor to advise on the proper locations of the lightning rods and to be the one responsible for the watertight seal. Location advice would include things like avoiding valleys, standing seams, or other areas that are difficult to seal or flash around. The electrician could then make the needed lightning rod penetrations in the agreed-upon locations and complete his work. Following right behind, the roofing contractor could install retrofit rubber roof jacks around the lightning rods and assure that they are sealed properly. Alternatively, the roofing contractor could make the penetration and allow the electrician to install the lightning rod, while the roofing contractor installs an appropriate rubber roof jack over or around it. Either way, the two trades need to  review the process ahead of time and be sure that everyone is on board to produce the best results for everyone involved.

Bottom Line: Think Through Penetrations

roof penetrations
Standing Seam Roof Penetration

Standing seam metal roofs have become more complex in recent years, with more and varied types of roof penetrations. This simply magnifies the need for better communication between the design professional, roof manufacturer, general contractor, roofing contractor, and any of the various trades that might be working on the roof.

When everyone takes the time to plan up front and think through their own needs and the options to get there, everyone wins. The architect/owner representative can ensure that his or her clients get a roof that will perform long-term. The roof manufacturer is able to provide expertise that has been gained over a long period of time through working with similar details on roofs all over the country. The roofing contractor can leave the project knowing that the details are long-term and will mean little chance for leak callbacks. Plus, the general contractor and the building owner can quickly resolve any arguments over which trade is responsible for repairing a roof leak.

Structural Penetrations in Standing Seam Metal Roofs

In our prior post on “Pipe Penetrations in Standing Seam Metal Roofs,” we identified important guidelines for when pipe penetrations are made to metal roofing systems, typically after the metal roofing is installed. That means an opening is cut in the metal roofing, it is properly flashed or sealed, and the penetrating member is passed through it. However, some penetrations are already in place before the roofing contractor shows up. These can be things like vertical members resting on the building structure that support a platform for HVAC equipment above the sloped roof. Or, it can be parapet wall with offsets or other conditions that are already in place. In cases like this, a different approach is needed to assure that the roof remains watertight.

Equipment Platforms for Structural Penetrations

Penetrations
Structural Penetrations in Standing Seam Metal Roofs

From the standpoint of a roofer, a structural equipment platform is a pre-existing condition. The metal roofing industry already recognizes the need to address such situations, particularly on existing buildings, by offering retrofit flashing and curb products. The same, proven approach can be used when pre-existing conditions are encountered on new buildings as well. For example, when structural posts for equipment platforms are encountered running up through the roof plane, roof jacks and curbs specifically designed for retrofit applications should be used. The retrofit roof jack, or boot, should be made out of rubber and be designed to install around the penetration, rather than over it. The boot should ideally rest on a two-piece retrofit pipe curb which can span across one or more standing seams and create a smooth, flat surface for the boot to be attached and sealed. The two-piece design allows for the pipe curb to be properly shingled on the up slope and down slope side of the roofing, thus preventing a “backwater lap,” which will leak. Trying to use only products intended for new construction on such conditions will require unwarranted field modifications or an over-reliance on caulking and sealant, all of which can be prone to problems and failure of the watertight abilities of the roofing.

Parapets

The use of parapet walls around some or all of a perimeter of a building is a common condition. However, if the building shape varies, and the parapet along with it, then there may be some rather uncommon conditions in which the roofing meets an offset or irregularly shaped parapet walls. The issue is that water coming down the sloped roof runs into the offset or other obstruction, causing a buildup of water and a potential leak. The typical approach is to provide a cricket, which is flashed into the parapet wall and diverts water away from the corner created by the offset. It is important, in this case, to be aware that standard sheet metal crickets have not proven to be effective. Instead, welded aluminum crickets and fixtures are recommended to create a truly watertight seal. Also, the welded cricket can be “shingled” into the roof to prevent “backwater laps.” The key is to provide a complete seal at the corners by welding the material, which cannot be done with sheet metal crickets.

Design Planning

The best way to address all of the structural roof penetration issues described here is with proper upfront planning. Avoiding any of these conditions would of course be ideal, and perhaps they can be designed out of some projects. However, if they’re unavoidable, then the roofing contractor and the design professionals need to review the conditions together ahead of time. This advance design planning is the best way to assure that the best, most effective detailing is employed and the proper materials are available on site.

Beauty and Braun: The Benefits of Mixing Insulated Metal Panels with Single-Skin Panels in Commercial Design

Commercial projects aren’t one size fits all. By bringing in metal panel products to suit the individual need, designers and architects can provide custom solutions for a variety of applications. Single-skin metal panels and insulated metal panels (IMPs), if used correctly, can together add both aesthetic and functional value to your projects.

While IMPs can provide superior performance with regard to water control, air control, vapor control and thermal control, you may sometimes find your project requires—from an aesthetic perspective—the greater range of choices available in single-skin profiles. Let’s spend a little time looking at some of the reasons behind the growing trend of specifying a combination of insulated metal and single-skin panels.

Benefits of Insulated Metal Panels

Insulated metal panels are lightweight, composite exterior wall and roof panels that have metal skins and an insulating foam core. Their much-touted benefits include:

  • Superior insulating properties
  • Excellent spanning capabilities
  • Insulation and cladding all in one, which often equates to a shorter installation time and cost savings

Benefits of Single Skin

Single-skin panels, on the other hand, with their expansive array of colors, textures and profiles, may have more sophisticated aesthetics. They can be used on their own or in combination with IMPs. It should be noted, too, that single-skin panels can—in their own right (as long as the necessary insulation is incorporated) —satisfy technical and code requirements, depending on the application.

Beyond aesthetics, when it comes to design options, single-skin products offer a wide range of metal roof systems, including standing seam roof panel, curved, and even through-fastened systems. As for wall systems, those may include concealed fastened panels, interior wall and liner panels, and even canopies and soffits, not to mention exposed fastened systems. Therefore, you have a wide range of not only aesthetics options but VE (Value Engineering) options as well.

Why Mix?

So, in what situations might the designer or architect choose to combine the two panel types? Let’s examine a couple of specific scenarios related to the automotive or self-storage worlds as a means of illustration. In both of these types of applications, it is not uncommon for the designer to recognize the importance of wanting to keep the “look” of the building consistent with branding or to bring in other design elements.

Coalville Wastewater Treatment Facility
The Coalville Wastewater Treatment Facility in Logan, Utah combines the insulated CFR panel with the single-skin Artison L-12 panel.

Single-skin panels can be used as a rain screen system in the front of the building or over the office area, and would provide the greater number of design options. In the rest of the building, designers can take advantage of the strength, durability and insulation benefits of IMPs. Although you could use one or the other for these examples, the advantage of mixing the two would be achieving a certain look afforded by the profiles of single-skin, while still adhering to stringent building codes and reducing installation time—which is the practical part of using IMPs.

Focus on HPCI IMP Systems

One great example of a current trend we’re seeing at MBCI is the use of the HPCI-barrier IMP system, along with single-skin panels. The High Performance Continuous Insulation (HPCI) system is a single system that is a practical and effective replacement for the numerous barrier components found in traditional building envelopes.

HPCI Insulated Metal Panels
The HPCI Insulated Metal Panel is quick and easy to install and provides an economical solution to conventional air, water, thermal and vapor control without sacrificing thermal efficiency.

A big benefit to using the HPCI system is that the barrier wall is already in place. In terms of schedule, the HPCI barrier system is typically installed by contractors who are also installing the single-skin system, eliminating the need for multiple work crews, and thereby minimizing construction debris and reducing the likelihood of improper installation. With a general lead time of four to six weeks for the HPCI and a week or two for the single-skin, the installation goes fairly quickly. Therefore, it appeals as the best of all worlds—a single system meeting air, water, thermal and vapor codes (ex.: IBC 2016, NSTA fire standards) plus the design flexibility of a single-skin rain screen product. (Note: The HPCI panel must be separated from the interior of the building by an approved thermal barrier of 0.5″ (12.7mm) gypsum wallboard to meet IBC requirements.)

Bottom line, HPCI design features and benefits include the following:

• Provides air, water, thermal and vapor barrier in one step
• Allows you to use multiple façade options while maintaining thermal efficiency
• Easy and fast installation, with reduced construction and labor costs

Conclusion

As designers, architects and owners are getting smarter about a “fewer steps, smarter dollars” concept and an increased awareness of applicable codes and standards, not to mention lifecycle costs, the trend towards maximizing the strengths of available systems will continue to grow. Whether the right choice is an IMP system, single-skin or some combination, the possibilities are virtually endless.

Selecting Metal Panels Based on Roof Slope

If you’re reading this article, then you are probably already aware that metal roofing can provide many benefits, including longevity, durability and water shedding—not to mention the aesthetic features of today’s metal roof products. When specifying a metal roof system, choosing the correct panel is a key factor. Roof slope is critical in determining that choice. Let’s take a look at some of the main things to consider when choosing a metal roof panel with regard to roof slope, including building codes, minimum slope requirements and typical applications.

Building Codes

Building codes are perhaps the most important driving force dictating the roof slope to choose. Different types of roofs have distinct specifications for installation. According to the 2012 International Building Code (1507.4.2 Deck slope), minimum slopes for roof panels need to comply with the following:

  1. The minimum slope for lapped, non-soldered seam metal roofs without applied lap sealant shall be three units vertical in 12 units horizontal (25-percent slope).
  2. The minimum slope for lapped, non-soldered seam metal roofs with applied lap sealant shall be one-half unit vertical in 12 units horizontal (4-percent slope). Lap sealants shall be applied in accordance with the approved manufacturer’s installation instructions.
  3. The minimum slope for standing seam of roof systems shall be one-quarter unit vertical in 12 units horizontal (2-percent slope).

Minimum Roof Slope Requirements

Depending on the roof profile, there are minimum roof slope requirements for each panel, which need to be considered. The profile refers to the shape the metal sheets take when they bend to form panels. Metal roof slope is expressed by a ratio indicating the roof pitch, which notes the vertical rise of the roof (in inches) for every 12 inches the roof runs horizontally—in other words, dividing the vertical rise and its horizontal span. The most common slopes are: 3:12, 1/2:12 and 1/4:12. When looking at metal roofing panel, you will need to consult with the manufacturer to ensure that the metal panel you selected will work for your application.

MBCI Roof Panels and Minimum Slopes

Applications: Low Slope or Steep Slope

Commercial Application– Low Slope Roofs

A low-slope roof is one whose slope is less than 3:12. Low slope roofs have several benefits. They have simpler geometry that is often much less expensive to construct and low slope metal roofs require fewer materials than a steep slope, which reduce material costs. Metal roofing panels are excellent solutions for roofs with low slopes. Commercial roofs are typically low slope (less than a 3:12 slope), and larger than residential roofs. This is due to low slope metal roofs being a bit easier to build on large structures.

1/2:12 Metal Roof Slope
Cecilia Junior High in Cecilia, Louisiana uses 7,180 sq. ft. of MBCI’s SuperLok®. This panel requires a minimum slope of 1/2:12.
Residential Application– Steep Slope Roofs

A steep slope roof is one whose slope is greater than 3:12. Steeper slopes are ideal for areas that have higher snow loads and will also prevent the possibility of ponding water on the roof. When it comes to residential construction, your roof is a visible part of the structure. Choosing a metal roof for residential construction involves choosing a panel profile that will be aesthetically pleasing.

Steel Slope Metal Roof
It is common to use steep slopes in residential applications, such as this home in Guntersville, Alabama that utilizes MBCI’s LokSeam® (requiring a minimum slope of 3:12).

Conclusion

Regardless of whether you’re choosing metal panels for a commercial or residential structure, slope matters. Following common standards, doing your research and paying attention to manufacturer guidelines regarding minimum slope will ensure you’re reaping the full benefit of your metal panel selection.

For More Information

To learn more about metal roof slopes, check out:

Choosing the Right Type of Standing Seam Roof (SSR)

When it comes to specifying standing seam roofs, one type doesn’t fit all. While a standing seam metal roof system can be one of the most durable and weather-tight roof systems available in the industry, its benefits can be negated if you fail to understand the details in application parameters of the specific system. Do your research, though, and for your next design that requires an aesthetically pleasing and structurally sound metal roofing system, you can choose with confidence the standing seam metal roof system that suits your project to a tee.

How to identify a good standing seam roof system

A good standing seam roof system is one that can satisfy both the project’s specific design criteria and adhere to building code standards. Standing seam profiles can include those that are utilitarian or architectural in nature, are of numerous widths and profiles and have varying seam joinery (e.g., snap or field seamed).

Why specify a standing seam metal roof system

When properly installed, standing seam metal roof systems are an extremely effective and long-lasting material choice. Key advantages include:

  • Weather-tight roofing system
  • Can be engineered to withstand high winds (150 mph and higher)
  • Class A Fire-resistance rating from UL
  • Class 4 Impact-resistance rating from UL
  • Long service life—up to 60 years
  • Lightweight
  • Special clips designed to accommodate thermal roof expansion and contraction and various thicknesses of fiberglass insulation

Matching the roof system to the project

In basic terms, there are four unique styles of metal standing seam panels: Double lock seam, symmetrical seam, one-piece snap-lock interlock and two-piece snap-lock interlock. These styles can be further delineated by seam shape or profile, i.e. trapezoidal rib, vertical rib, square rib and tee rib. The choice of the rib profile, as well as the rib spacing is generally an aesthetic preference of the designer. Knowing which style will best suit a given situation will help ensure a successful installation.

Popular Standing Seam Metal Panels

Double Lock Standing Seam
Shown: MBCI Double-Lok®

One-Piece Snap Lock Interlock Standing Seam
Shown: MBCI LokSeam®

Two-piece Snap Lock Interlock Standing Seam
Shown: MBCI Craftsman™

Some criteria to consider are roof slope, roof run (distance from eave to ridge), weather conditions (such as ice or snow) and architectural features, i.e. hips, valleys, dormers, parapet walls, etc.

For instance, if your project has a roof slope of 1/2:12 you will need to ensure the product being installed is approved for this low pitch. In this case, you would likely use a “double lock” or mechanically “field-seamed” panel. You also want to ensure that all details are able to provide for a weather-tight seal even if temporarily submerged during a heavy rain. Field-seamed panels are also the best choice in areas that experience heavy ice and snow.

Additionally, it is imperative to recognize complicated design details that should be carefully specified and reviewed regardless of the roof slope. Design conditions that require special attention include: roof transitions, dead valleys, dormers, eave offsets, ridge offsets and offsets in parapet walls.

It cannot be overstated that you should always consult a metal roofing manufacturer about the capabilities of the standing seam metal roof system, including what warranties are available, prior to specifying it.

Browse the standing seam product manual for more information.

Design and testing

Familiarize yourself with wind uplift testing as prescribed by Underwriters Laboratories (UL-90 – 580 Test) and ASTM E-1592.

Best Applications for Water Barrier Standing Seam Metal Roof Panels

We discussed water shedding standing seam metal roofs in my last post, and the fact that despite their water shedding properties, you still really must guard against water infiltration. Today I’ll discuss water barrier roof systems, which are structural standing seam roofing systems. These panels can withstand temporary water immersion over the panel seams and end laps. They normally have factory applied mastic in the seams to insure weather integrity. End laps, when needed, are installed using high quality tape and/or bead sealant supplied by the manufacturer. The trim designs used with these systems are much more water resistant as well.Water barrier SSR

The advantage these water barrier SSRS systems offer:

  • They require no deck. This is a tremendous savings on the in-place roof cost.
  • Many systems can be installed on roof slopes as low as ¼:12. This allows greater design flexibility and can also save on the in-place roof cost.
  • Because they are the only thing between the interior of a building and the weather, these are the most tested metal roof systems available. Manufacturers spend a lot of time and money testing these systems for air and water intrusion, dead load, wind uplift and fire.

Water barrier SSRSs can be further divided by seam type—trapezoidal or vertical rib.

Trapezoidal systems usually have a rib height of 3 inches. The most common panel width is 24 inches, although some manufacturers offer them in other widths as well. Trapezoidal systems are traditionally thought of as commercial or industrial standing seam systems. They are used on warehouses, factories and buildings where the roof is not meant to be seen from the ground. However, some designers have taken these systems and incorporated them into architectural applications with stunning results.

But be careful. Trapezoidal rib systems are much harder to seal at hips and valleys than vertical rib systems. The outside closures at the hip must be cut on a compound bevel with a trapezoidal system. At a valley, the panels are harder to seal because they require an inside closure; the vertical rib panels do not.

Vertical rib systems have traditionally been thought of as non-structural. However, there are now many vertical rib systems available that can span purlins or joists. These systems are available in a wide variety of panel widths, ranging from as little as 10 inches to as much as 18 inches wide. Rib heights vary from 1 foot to 3 feet.

Vertical rib systems are usually easier to install than the trapezoidals. There are fewer parts to the typical vertical seam system, which makes for a simpler, quicker installation. Because there are no inside closures, valleys are much easier to seal and quicker to install. Hips are easier to seal because the outside closures can be cut quickly and simply from a stock length of zee closure.

For these reasons, the vertical rib systems are often a better choice for applications on high-end architectural roofs. Ask just about any metal roof installer, and he will tell you that he prefers the vertical rib system over the trapezoidal system in this application.

Bottom line, when selecting a roof system, choose function first, then aesthetics.  When you use the wrong roof system for a given function, the installation process becomes complicated, and results less than ideal. With so many great metal roof options, don’t make life more complicated and uncertain than it need be.

And to make things simple, safe and sound, choose from MBCI’s array of metal roofing system products. Find out more.

Best Applications for Water Shedding Standing Seam Metal Roof Panels

A standing seam roof system, or SSRS, has exposed fasteners only at the eave and at specially designed end laps. The concealed clips installed at the panel seam typically allow the panel to float during thermal movement. These systems are normally manufactured in 24 gauge, though 22 gauge is often used.

People tend to classify SSRS as either structural or architectural, but those two distinctions aren’t absolute. There are many architectural SSRS that are structural systems, and most structural SSRS can be used in an architectural application. I think the better distinction is that SSRS are either water shedding or water barrier systems.

Water Shedding SSRSs

Water shedding panel systems are architectural SSRS, meaning they rely on gravity to shed water from the roof before it can build up on the metal panels. The steeper the roof slope, the faster the water will run off. However, in certain instances, these roofs still may allow water to infiltrate.

The following precautions can be taken to avoid this:

  1. Water shedding panel systems must be installed on a minimum roof pitch of 3:12 or greater. Panel manufacturers typically advertise the minimum recommended slope for each of their products.
  1. They must be installed over a solid deck, since they are not structural panels.
  1. The deck must be covered with a moisture barrier or membrane. This is critical as the moisture barrier is the last line of defense once water gets under the metal roof panels. The industry standard for years has been #30 felt. I think this should be considered the absolute minimum.

    A better, though more expensive solution is to use a peel and stick membrane. These are much more tear resistant and they will self-seal to nails and screws. Check with the membrane manufacturer about ventilation requirements as these membranes can trap moisture in the attic space if it is not well ventilated.

  1. Keep the design simple. Because these roofs only shed water, intricate trim details are usually not as watertight as those used with water barrier systems. Valleys, hips and other architectural effects can certainly be utilized, but with them comes a much greater chance for water intrusion.

Next post, I’ll get into the applications for water barrier standing seam roof systems

A standing seam metal roof system from MBCI is one of the most durable and weathertight roof systems available in the industry. So when your design requires a roofing system that is both aesthetically pleasing and structurally sound, choose one of MBCI’s six standing seam metal roof systems. Read more.


Find a sales representative

Power is restored at the Houston plant. We’re working to resume production ASAP. Thank you for your patience.