The Importance of Vapor Seals in IMP Installations

Insulated metal panels (IMPs) used for building envelopes offer great simplicity in terms of enclosing a building in an attractive, energy-conscious manner. However, they require somewhat different thinking in terms of design and installation compared to conventional single skin panels on metal building with separately installed fiberglass insulation and vapor liners. That’s because, while the insulation aspect of IMPs is well controlled in the factory, the air and vapor sealing aspects are entirely in the hands of the installers in the field.

Why is vapor sealing a concern? Because it can make or break a building envelope. Airborne moisture that travels through seams, joints, or gaps between IMPs or between the panels and the structural steel can condense and wreak havoc on the integrity of the wall system. If that condensed moisture makes its way to unprotected edges of metal, then rusting, staining, and deterioration can occur. If it collects and drains out the bottom of the panel, then a building owner may mistakenly think that the IMPs are leaking water. If the moisture works its way inside a panel and becomes trapped it could freeze in cold climates or applications, and push panels enough to make unsightly or fail to perform as intended.

How does an installer of insulated metal panels avoid these issues? By properly using sealants as recommended by the IMP manufacturer to close the gaps and assure a vapor-tight installation. Here are the key things that installers need to pay attention to:

Sealant Types

In most cases, butyl caulking is the recommended sealant for panel joints and perimeter attachments, although urethane sealant may be called for in some cases. For fire-rated panels, silicone sealants are usually required. The important caveat for all of these sealants is that they are most successfully installed when they’ve been stored within acceptable temperature ranges. In cold weather, they may need to be kept in a warming bin; in warm weather they must be kept out of direct sunlight.
IMP
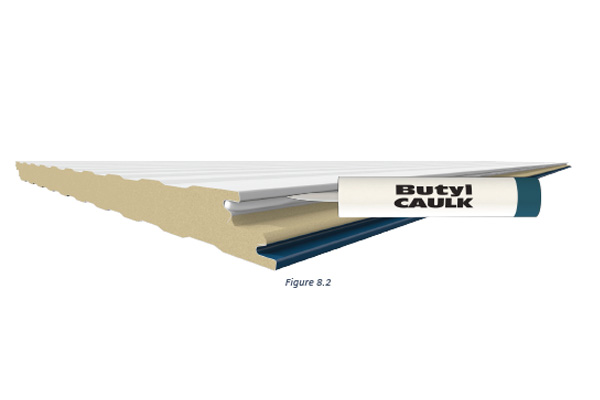
Apply continuous non-curing butyl sealant to the interior panel joint with a bead size of approximately 1/4″ as shown above.

Tools to Use

Applying any of the needed sealants will require using the proper tools. Manual caulking guns don’t provide the consistent quality of application needed, so electric or pneumatically operated applicators are required.

Sealant Location

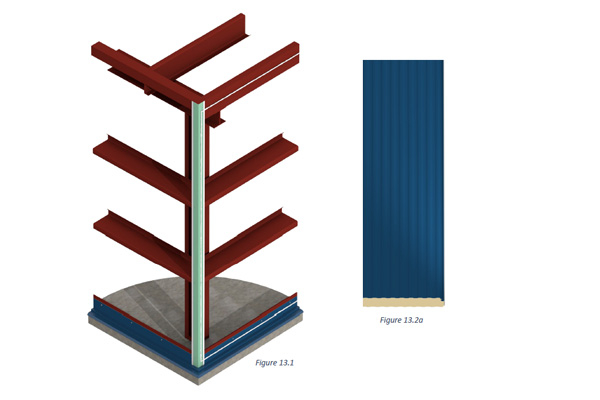
For typical building applications (non-freezer/coolers), the vapor sealant is placed in the interior panel joints when IMPs are installed vertically. For refrigerated spaces, the sealant is commonly placed on the exterior. If the IMPs are installed horizontally, then it usually is sealed on both the interior and the exterior panel joints to help with weather sealing as well. Note that the final placement of the sealant, as well as type and location, is actually the responsibility of the mechanical contractor/architect and not the panel supplier as it is to be based also on the mechanical design of the building envelope. In addition, the entire perimeter of the panels where they meet the building structure needs to be sealed. This includes the base flashing, interior corner trim, and eave struts. Further, marriage beads of butyl sealant must be placed at all panel terminations.
IMP
Panel Installation – Sealant

Sealant Continuity

In order to be effective, all sealant and caulking must be fully continuous. That means that the thickness of the sealant bead must be consistent and thick enough to fully close all gaps between or around IMPs. It should not be overdone, however, since too much sealant will ooze out between panels that are pressed together, causing a bit of a mess on one side of the other. Sealant continuity also means that it can not be interrupted due to poor adhesion. Therefore, before any sealant is installed, the application surfaces must be cleaned and dry to be sure that full adhesion is achieved. Always check with the panel suppliers details for minimum bead size and critical locations.

Factory-Installed Option for IMP

Some IMP manufacturers offer the option of having sealant pre-installed along the edges of the IMPs. Since the panels are wrapped and sealed for shipping, the sealant is protected and should be ready for use onsite. However, in this case, it is incumbent on the installers to handle the panels quite carefully, since the inadvertent placement of a hand over the sealant can damage it or deform it enough to render it ineffective. This factory-installed option offers a labor saving in the field but must be checked during installation and can be impacted by time climate depending on the time of year. Field application, while requiring more labor, does provide greater onsite flexibility for installers. Nonetheless, in all instances, the installer must ensure the sealants are properly located.

By paying attention to the details of sealing and caulking, a metal building constructed with IMPs will be a quality installation that will hold up quite well over time. To find out more about IMP metal products and systems that can help your next building be more vapor- and weathertight, contact your local MBCI representative.
Best Applications for Water Barrier Standing Seam Metal Roof Panels

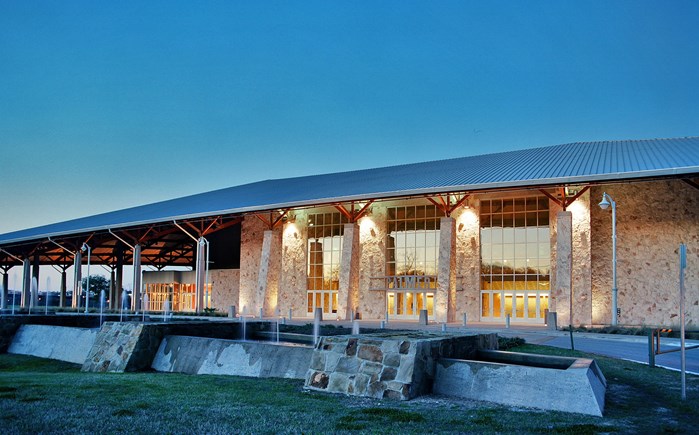
We discussed water shedding standing seam metal roofs in my last post, and the fact that despite their water shedding properties, you still really must guard against water infiltration. Today I’ll discuss water barrier roof systems, which are structural standing seam roofing systems. These panels can withstand temporary water immersion over the panel seams and end laps. They normally have factory applied mastic in the seams to insure weather integrity. End laps, when needed, are installed using high quality tape and/or bead sealant supplied by the manufacturer. The trim designs used with these systems are much more water resistant as well.Water barrier SSR

The advantage these water barrier SSRS systems offer:

  • They require no deck. This is a tremendous savings on the in-place roof cost.
  • Many systems can be installed on roof slopes as low as ¼:12. This allows greater design flexibility and can also save on the in-place roof cost.
  • Because they are the only thing between the interior of a building and the weather, these are the most tested metal roof systems available. Manufacturers spend a lot of time and money testing these systems for air and water intrusion, dead load, wind uplift and fire.

Water barrier SSRSs can be further divided by seam type—trapezoidal or vertical rib.

Trapezoidal systems usually have a rib height of 3 inches. The most common panel width is 24 inches, although some manufacturers offer them in other widths as well. Trapezoidal systems are traditionally thought of as commercial or industrial standing seam systems. They are used on warehouses, factories and buildings where the roof is not meant to be seen from the ground. However, some designers have taken these systems and incorporated them into architectural applications with stunning results.

But be careful. Trapezoidal rib systems are much harder to seal at hips and valleys than vertical rib systems. The outside closures at the hip must be cut on a compound bevel with a trapezoidal system. At a valley, the panels are harder to seal because they require an inside closure; the vertical rib panels do not.

Vertical rib systems have traditionally been thought of as non-structural. However, there are now many vertical rib systems available that can span purlins or joists. These systems are available in a wide variety of panel widths, ranging from as little as 10 inches to as much as 18 inches wide. Rib heights vary from 1 foot to 3 feet.

Vertical rib systems are usually easier to install than the trapezoidals. There are fewer parts to the typical vertical seam system, which makes for a simpler, quicker installation. Because there are no inside closures, valleys are much easier to seal and quicker to install. Hips are easier to seal because the outside closures can be cut quickly and simply from a stock length of zee closure.

For these reasons, the vertical rib systems are often a better choice for applications on high-end architectural roofs. Ask just about any metal roof installer, and he will tell you that he prefers the vertical rib system over the trapezoidal system in this application.

Bottom line, when selecting a roof system, choose function first, then aesthetics.  When you use the wrong roof system for a given function, the installation process becomes complicated, and results less than ideal. With so many great metal roof options, don’t make life more complicated and uncertain than it need be.

And to make things simple, safe and sound, choose from MBCI’s array of metal roofing system products. Find out more.

Details, Details, Details

Water runs downhill.  And, gravity is our friend.  Yet sometimes we forget these basic concepts when installing metal panel roofing.

When it comes to metal roofing details, a contractor should always think about the flow of water.

Roofing contractors are in the business of controlling water, so let’s install details that allow water to run downhill and let’s use gravity to our advantage.  A more precise way to say it: Implement drainage details that don’t buck water!

Details, details, details

Defending Against Water Leaks

Metal roof penetration and edge details should not rely on sealant as the primary defense against water leaks.  Certainly, sealant is and should be used as a secondary measure against water leaks.  Consider this: A transverse panel seam is created by lapping the upper panel over the lower panel, and sealant is used as a secondary seal.  Installers would never reverse the lap of a transverse seam (where the lower panel is on top of the upper panel), bucking water and relying only on sealant to keep water out.  A penetration detail (e.g., a vent stack or roof curb) should use the same logic.  There’s no doubt that bad details are rooted in low cost and speed of installation, but those are not details that are going to have equal service life to the metal panels on a roof.  A penetration detail is as critical to the long-term success of a metal roof as a transverse seam.

Prefabricated Penetration Details

It’s best to use prefabricated penetration details that have welded or soldered weathertight seams.  The prefabricated piece should be the width of a panel and include the male and female seams, and be seamed into the adjacent panels.  And just like a typical transverse seam, the top edge of the prefabricated piece should be under the upper panel, and the bottom edge of the prefabricated piece should be above the lower panel.  Water is not bucked and seams are fully intact.  That is a long-term penetration detail.

Where proper overlap can’t happen, redundancy is necessary.  A small pipe penetration detail should use a rubber roof jack with added levels of redundancy for weatherproofing.  First, the roof jack should only be installed in the flat of the panel; sealant tape should be installed between the panel and the roof jack; and closely spaced, gasketed fasteners should be installed to create compression on the sealant.

Roofing That Lasts

Metal roofs sell themselves because metal is long-lasting.  And construction details need to be developed and installed with that in mind.  Metal panels don’t leak—the joinery and fastener locations can leak.  Remember to design and build details that have equivalent service life to the panels themselves.  Proper laps are critical, and remember, gravity is our friend.

To learn how to design a roof system that prevents possible infiltration and allows for proper water runoff, take MBCI’s AIA-accredited course, The Devil is in the Details.

Find a sales representative