Cutting Metal Panels Properly On Site

Cutting metal panels on site is an often-necessary part of installing metal roofing and wall panels. However, using the right tools and methods to ensure the panels remain damage-free is vital. Using the wrong tools can result in rust, rust stains, the voiding of warranties and diminished building service life. In this blog post, we’ll share several common field-cutting techniques and best practices that help ensure good results.


Maintaining Longevity When Cutting Metal Panels On Site

When metal panels are made in a manufacturing facility, the tools and methods used to cut the coated metal coil help protect the cut edge from deterioration like corrosion. When cutting metal panels on a jobsite or in the field, protecting any cut edges is just as important. To understand how to field-cut metal panels without sacrificing the quality and protection delivered from the manufacturing facility, you must first understand the what protects the panels. Most often, metal roof and wall panels are fabricated from Galvalume®-coated steel coil because of its proven longevity. Not only does the Galvalume coating protect the surface area of the metal panels, it has also been shown to be effective along the thin edges of the metal too, as long as those edges are cut properly.

During fabrication, the Galvalume metal panels are cut to length either by shearing while flat before entering the roll former, or by means of a profile shear as the panels exit the roll former. Either method tends to “wipe” the Galvalume coating across the cut edge of the metal panels. This provides superior cut-edge protection from corrosion.

Likewise, when panels arrive on site, any needed field cutting should address the same concerns of protecting the edge of the steel from corrosion. Of course, there are ways of doing the field cutting correctly. However, there are also poor strategies that can lead to real problems. The following are examples of common field cutting tools and the best practices for good results.


Common Tools and Methods for Cutting Metal Panels On Site:

Aviation Snips

Red and green aviation snips are a good choice for small cuts on metal panels, such as around pipe penetrations. These snips will wipe the Galvalume® coating in the same way as factory shears, making them a good choice.

Electric Shears

Electric shears are optimal when making lengthier cuts along the steel, such as cutting a wall panel at a corner or at a door opening. These shears take a ¼” strip of metal out of the panel during the cutting process, which tends to leave both sides of the panel smooth and flat along the cut. Like the aviation snips and factory shears, electric shears will wipe the Galvalume coating and protect the edges.

Mechanical Shears

Mechanical shears are an add-on tool that fit onto a battery-operated impact or screw gun. These shears do not take any metal out of the panel and will leave a slightly wavy edge. Mechanical shears are an excellent choice for bevel cutting standing-seam panels at hips and valleys, since they too wipe the Galvalume coating over the cut edges to offer protection.

Nibblers

A nibbler is a great tool for cutting across corrugations in wall panels to create openings for windows, doors and similar structural additions. A good nibbler typically costs $500-$700 (currently), but is well worth it if you often cut corrugated metal panels. The punch and die in the nibbler tends to wipe the Galvalume across the cut edge as it punches out small, half-moon shaped pieces of panel. However, because these little metal pieces will fall away from the cut, it’s important to contain them so no one walks on them. Otherwise, they can embed in the soles of installer’s shoes and create scratches in roof panels when they walk on the roof.

Skill Saw

Skill saws are an ideal tool for cutting metal panels because of their versatility. This tool can cut either across or parallel to corrugations, whether straight or at an angle. When using a skill saw, it is critical to use a saw blade that cuts cool. Otherwise, the Galvalume coating can melt along the cut edge and become ineffective. In particular, do not use an abrasive blade, which will generate heat and damage the coating.
MBCI Blog: Field Cutting Metal Panels On Site
Panels cut with abrasive blades corrode. A cool-cutting blade leaves a smooth edge.


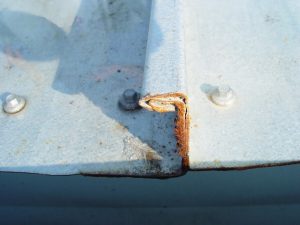
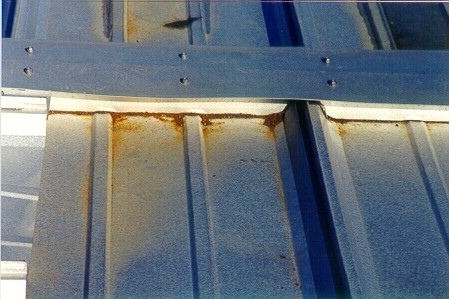
Additionally, its vital to avoid cutting panels on the roof or above other panels. A skill saw blade will throw considerable amounts of steel debris into the air and down onto any panels below. This debris, called swarf, will quickly rust and ultimately cause rust spots in the panels. If enough swarf gathers in one spot, it can rust through the panel.

MBCI Blog: Field-Cutting Metal Panels On Site

Steel swarf, like this collected at the ridge will rust through the panel.


Which Tools Should To Avoid When Cutting Metal Panels On Site:

Tools that should never be used include:

  • Torches
  • Cut-off saws
  • Reciprocating saws
  • Hacksaws
  • Grinders

All of these tools will melt the Galvalume® coating, causing edge rust just like an abrasive blade would. These tools also throw a lot of steel debris (swarf) onto the panels they cut. This debris will be hot and will embed into the panel coating. This can cause rust spots and bigger problems down the road.

In conclusion, using the right tools and following metal panel manufacturer recommendations when cutting metal on site will help ensure that the panels remain damage-free and the final installation will be a fairly seamless process. Using the wrong tools can result in rust, rust stains, and the voiding of warranties. For more on best practices and recommendations for on-site cutting and installation of metal panels contact your local MBCI representative.
Tips for Installing Metal Roof Curbs

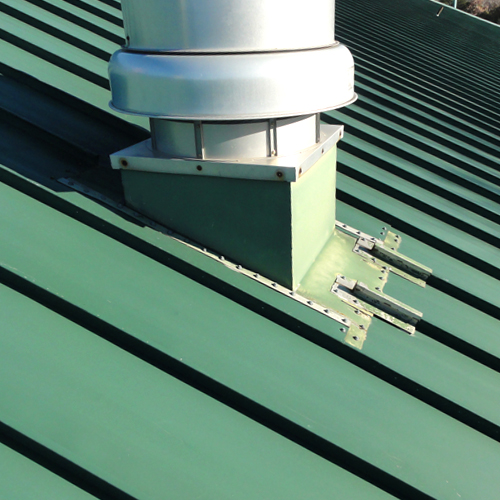
Metal roofs made from galvalume-coated steel provide great corrosion resistance and can readily satisfy a 20-year weather-tightness warranty. However, when a large penetration in the roof is needed, such as a large exhaust fan or other equipment, the integrity of the roof can be compromised if not addressed properly. The common method of dealing with large penetrations (i.e., spanning over one or more standing seams) is to install roof curbs that form the transition between the roof and the equipment being installed.

Of course, like most aspects of building construction, there are choices available in materials, methods, techniques, and styles of installing a roof curb. When the key objective is to provide a curb that will perform for the entire life of the standing seam roof, there are four key points to keep in mind.

Roof Curbs
Roof Curbs for Standing Seam Metal Roofs

Pick the Proper Material:

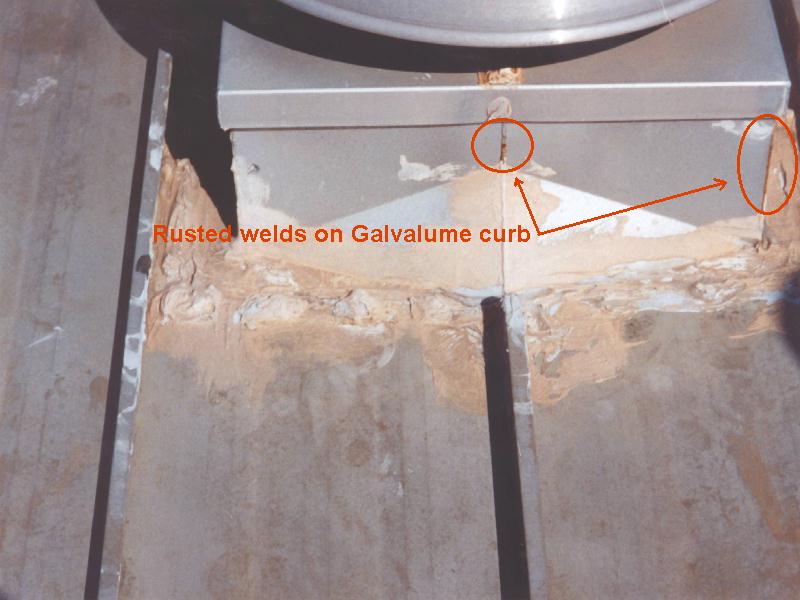
A galvalume-coated roof doesn’t mean that a galvanized steel roof curb is the best thing to use – in fact, galvanized roof curbs are known to rust, corrode, and leak, particularly along weld joints, as soon as a year after installation. Instead, a curb made from aluminum (preferred) or stainless steel should be used to prevent premature corrosion. To put any concerns about dissimilar materials and galvanic corrosion to rest, keep in mind that galvalume is approximately 80 percent aluminum by volume, so they are highly compatible.

Rusted Roof Curbs
Rusted Welds on a Galvalume Roof Curb

Use the Proper Roof Curb Type:

It is not uncommon for a roofer to choose a curb type referred to an an “over/over” curb, meaning that, after the opening is cut, the curb is installed over the roofing on both the upslope and the downslope sides. This might be the easiest to install during construction, but it will very likely create more work and callbacks when the upslope side starts to get water into or under the joint, and leaks. Instead, it is well worth taking a few extra minutes to install an “under/over” curb, which places the upslope side under the roofing in a true shingled lap between the curb and the roof. This way, the upslope edge is much more protected and less likely to leak using the same shingled condition occurring on the downslope side – all creating a properly water-shedding, weathertight condition.

Provide the Proper Water Flow Clearance:

We all know that water seeks the path of least resistance, so the key to keep water flowing down a roof is to avoid creating pockets of resistance. This is particularly true on the upslope end of a curb as well as on the two sides parallel to the slope of the roof. A curb with a minimum clearance of 12 inches between it and any other object on the upslope end will give water enough room to flow around the curb easily. Similarly, once the water reaches the two sides, at least 6 inches of free clearance is needed (i.e., without being encumbered by standing seams or other features) to allow the water to keep going and not back up to create a water head at the upslope end of the curb. Simply put, clearance means free-flowing drainage; lack of clearance can mean water buildup and leaks.

Install Roof Curbs Rib to Rib:

Installing curbs that rest in the flat, lower, panel area of metal roofing invites water tightness problems since the curb now has to be installed and sealed in the most vulnerable area – the surface where rainwater flows. Instead, coordinating the curb size with the rib spacing to provide a rib-to-rib curb eliminates fasteners down both sides of the curb in the pan of the roof panels. Placing the curb on and attaching it to the ribs also allows better transitioning from under the roofing on the upslope end to cover the roof on the downslope end. This type of curb has the added benefit of being able to be installed either during the roof installation of after the roof is finished.

Taking these four points into account in your next metal roofing project where roof curbs are required will help assure a well-installed, weathertight condition that should last just as long as the metal roofing system itself.

Standing the Test of Time: New Study Reveals 55% Al-Zn Alloy Coated Standing Seam Roofs Last 60 Years

The majority knows that metal roofs are durable, but it wasn’t until recently that a study showed the longevity of low-slope unpainted 55% Al-Zn alloy coated steel standing seam roofing (SSR) systems- 60 years. With the service life of a commercial building being 60 years, according to LEED version 4, this means that essentially the metal roof system described above, and commonly referred to as Galvalume® metal roofs, does not require replacement. To put this into context, by comparison most non-metal roofs require at least one replacement during the same period. This study also reveals that the longevity of a 55% Al-Zn alloy coated standing seam roofing system far surpasses the typical warranty period granted, which is 25 years. Basically, this is a game changer and we, manufacturers, are thrilled!

Technical Director of MCA Scott Kriner said, “This study is a breakthrough for the metal construction industry because it finally provides third-party, scientific data that backs up the long held stance that 55% Al-Zn coated steel standing seam roofing systems are very durable, economic and can be better for the environment.”

Let’s take a closer look at the study. The Metal Construction Association (MCA) and Zinc Aluminum Coaters (ZAC) Association sponsored it. The study involved three independent consulting firms testing 14 buildings in five climate zones. The variety of structures and climates allowed them to analyze how Galvalume metal roofs perform in a range of temperatures, humidity and precipitation pH, or acidity, levels. All of these can affect the metallic corrosion rate of roof panels, their sealants and components, and that’s what the consulting firms analyzed.

Here were some of their findings:

  • First, the sealant life is the primary deciding factor in establishing end-of-life for Galvalume metal roof systems. In certain structures analyzed that were 35 years old, the sealant was considered “entirely adequate and without issue.” Based on the sealant performance, the study conservatively projected the lifespan of such roof systems to be 60 years.
  • Secondly, although a Galvalume metal roof is moderately maintenance-free, all roof systems require a periodic inspections and maintenance in order to achieve such long lifespans.
  • Thirdly, while the roof system as a whole was projected to last up to 60 years, components may need to be replaced during this period. The cost of replacing components, however, is considerably less than 20% of replacing an entire roofing system, which is the value deemed by this study as excessive to the point of constituting the end of service life for a roof system.
  • Lastly, the study unveiled that even on areas typically most susceptible to corrosion, such as panel profile bends, there was an absence of significant rust after 35 years; even at its most vulnerable areas, a Galvalume metal roof system performs well.

So what does it mean for architects and building owners? Speaking from a purely biased manufacturer’s prospective, specify and purchase more metal roofs! All jokes aside, this study displays the appeal in selecting a metal roof because it reduces the maintenance costs of the building. It also changes and increases the accuracy of Life Cycle Cost (LCC) or whole building Life Cycle Assessment (LCA) associated with Galvalume metal roof systems by providing tangible research as opposed to previous calculations based on roofing professionals’ opinions. To find out more information or to download the full report, visit http://www.metalconstruction.org/index.php/education/technical-resources.

Find a sales representative