Choosing the Right Type of Standing Seam Roof (SSR)

When it comes to specifying standing seam roofs, one type doesn’t fit all. While a standing seam metal roof system can be one of the most durable and weather-tight roof systems available in the industry, its benefits can be negated if you fail to understand the details in application parameters of the specific system. Do your research, though, and for your next design that requires an aesthetically pleasing and structurally sound metal roofing system, you can choose with confidence the standing seam metal roof system that suits your project to a tee.

How to identify a good standing seam roof system

A good standing seam roof system is one that can satisfy both the project’s specific design criteria and adhere to building code standards. Standing seam profiles can include those that are utilitarian or architectural in nature, are of numerous widths and profiles and have varying seam joinery (e.g., snap or field seamed).

Why specify a standing seam metal roof system

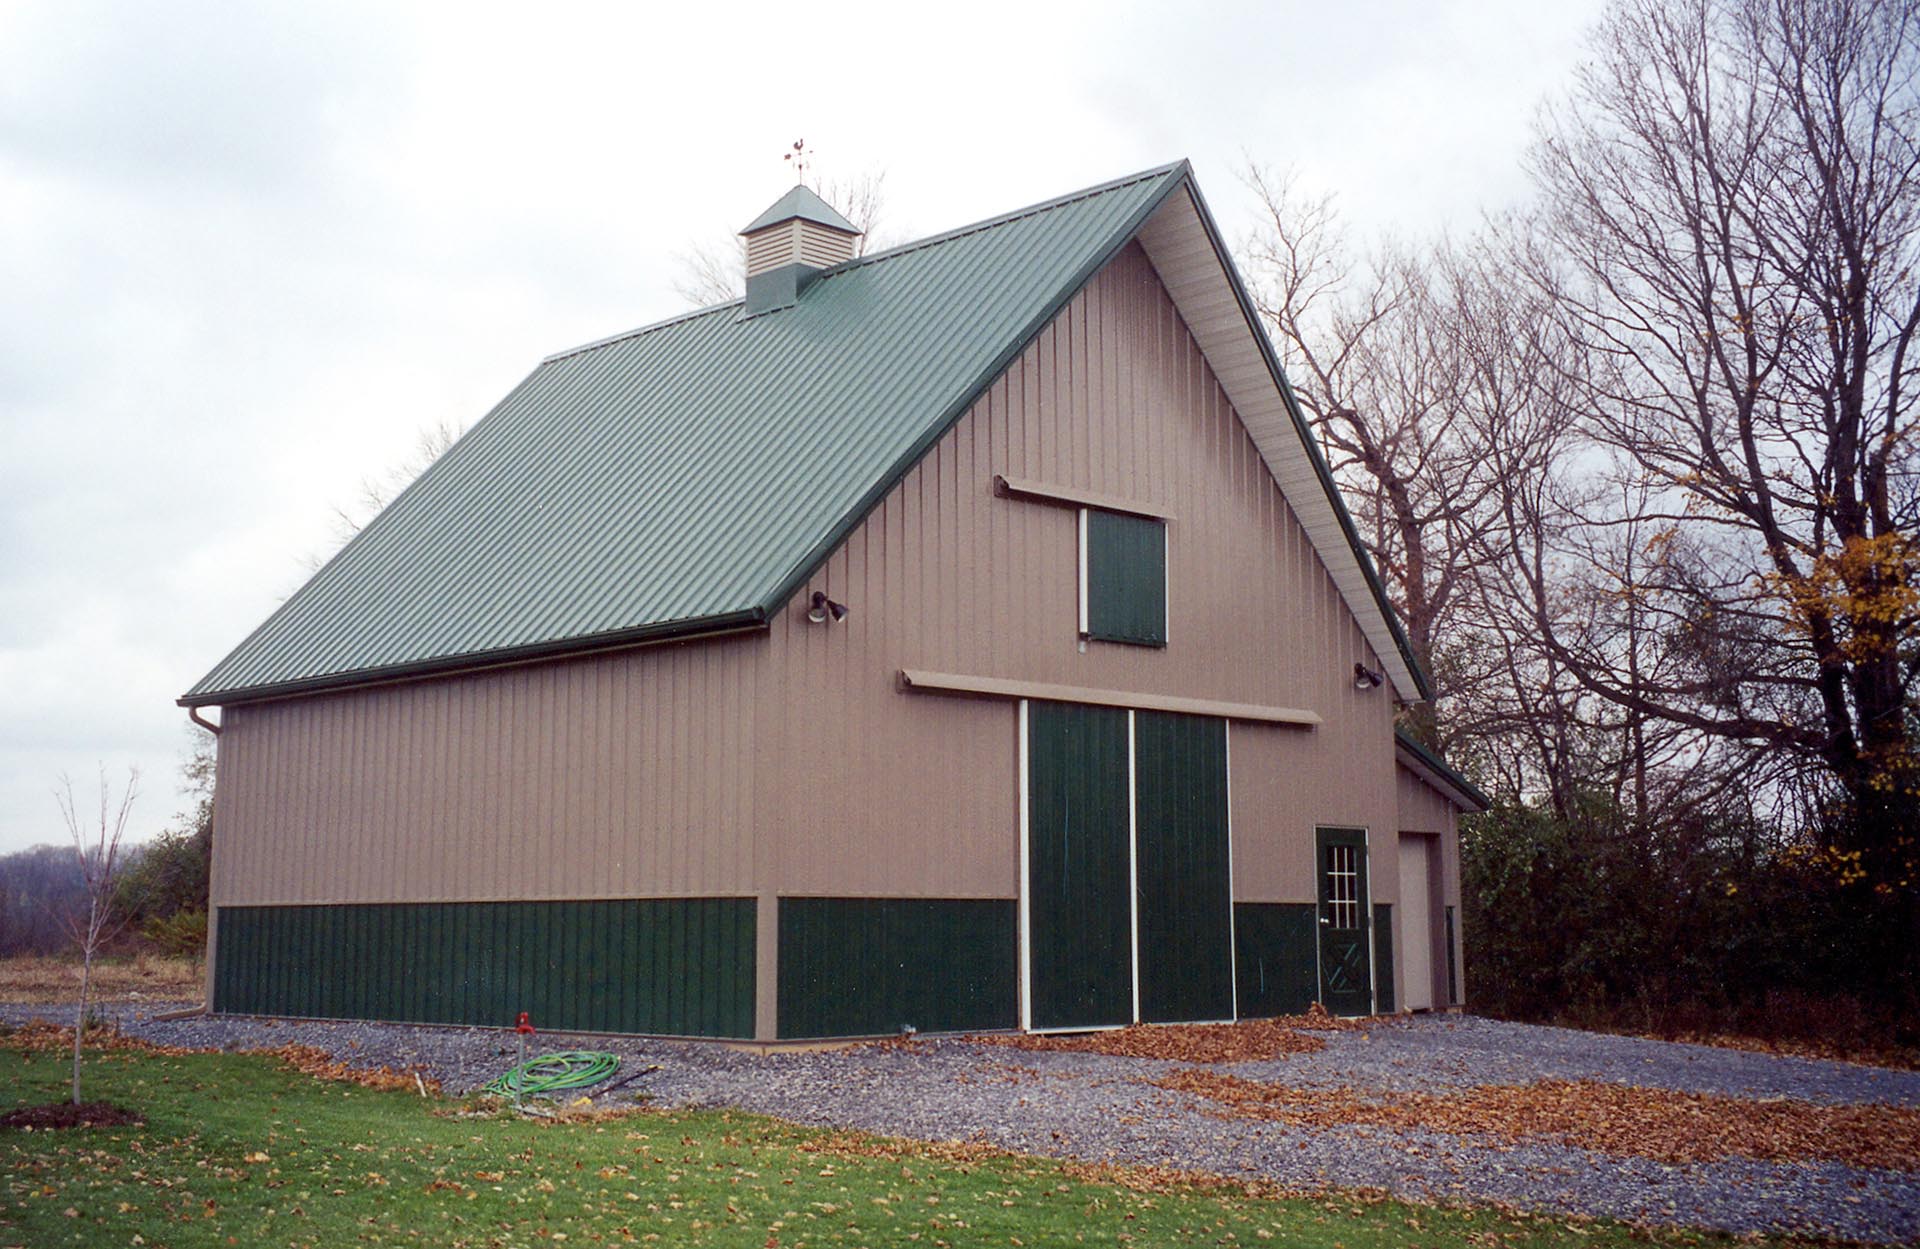
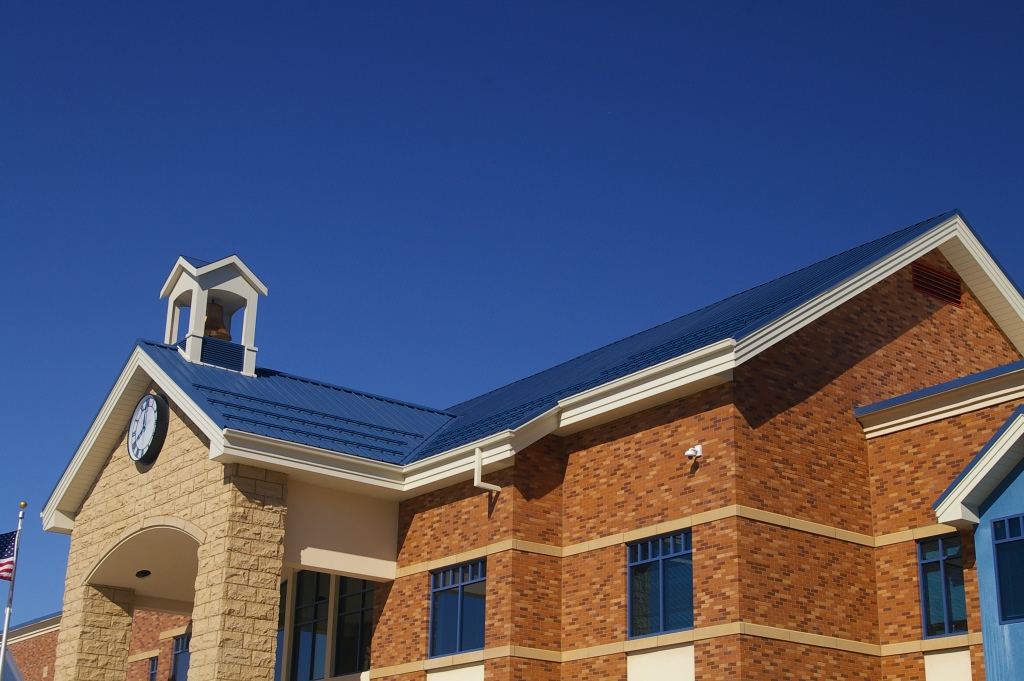
When properly installed, standing seam metal roof systems are an extremely effective and long-lasting material choice. Key advantages include:

  • Weather-tight roofing system
  • Can be engineered to withstand high winds (150 mph and higher)
  • Class A Fire-resistance rating from UL
  • Class 4 Impact-resistance rating from UL
  • Long service life—up to 60 years
  • Lightweight
  • Special clips designed to accommodate thermal roof expansion and contraction and various thicknesses of fiberglass insulation

Matching the roof system to the project

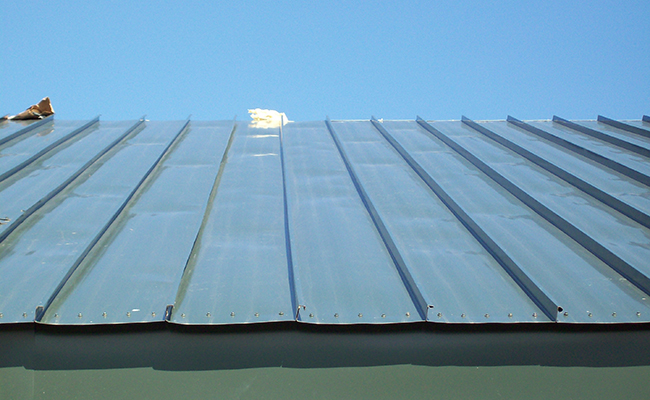
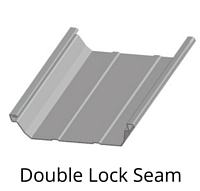
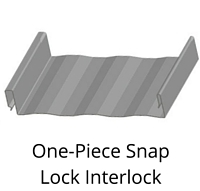
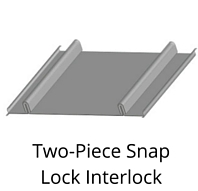
In basic terms, there are four unique styles of metal standing seam panels: Double lock seam, symmetrical seam, one-piece snap-lock interlock and two-piece snap-lock interlock. These styles can be further delineated by seam shape or profile, i.e. trapezoidal rib, vertical rib, square rib and tee rib. The choice of the rib profile, as well as the rib spacing is generally an aesthetic preference of the designer. Knowing which style will best suit a given situation will help ensure a successful installation.

Popular Standing Seam Metal Panels

Double Lock Standing Seam
Shown: MBCI Double-Lok®

One-Piece Snap Lock Interlock Standing Seam
Shown: MBCI LokSeam®

Two-piece Snap Lock Interlock Standing Seam
Shown: MBCI Craftsman™

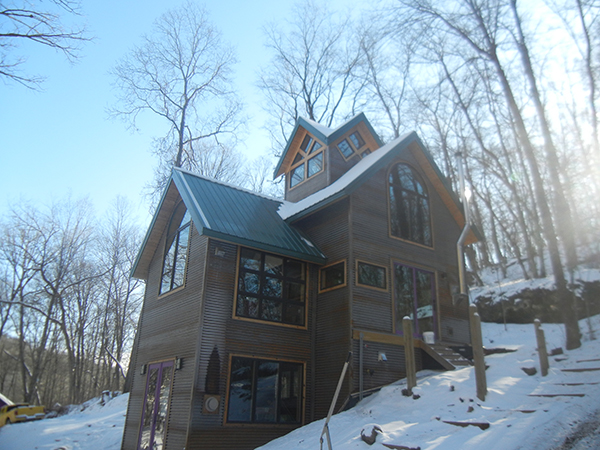
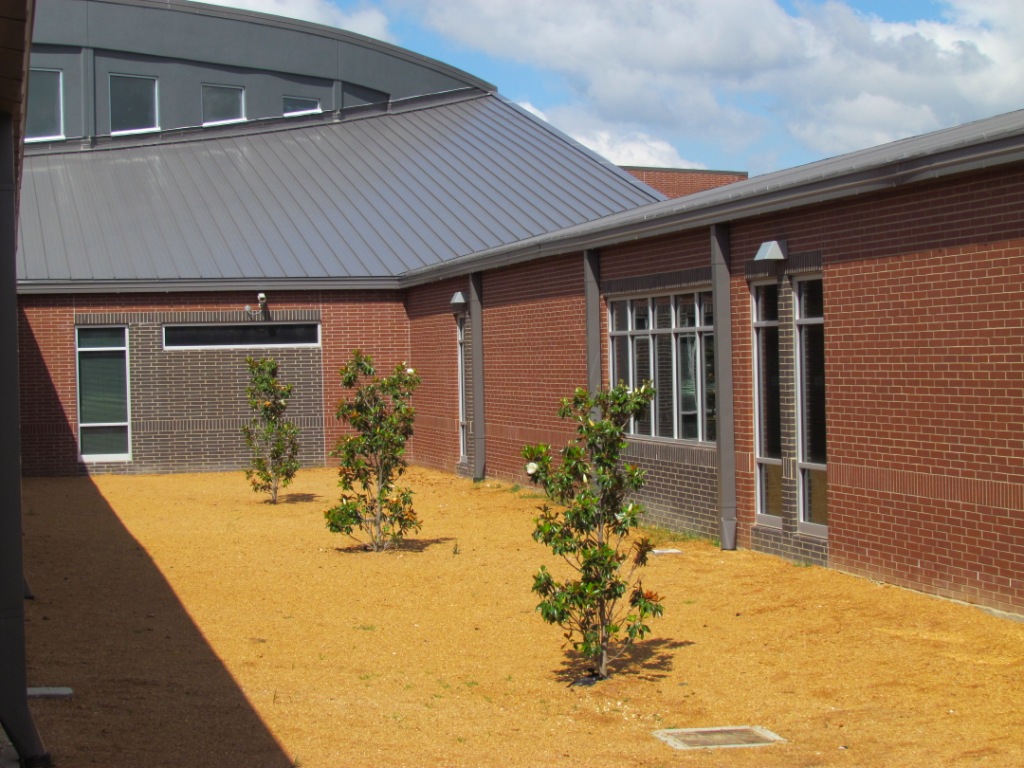
Some criteria to consider are roof slope, roof run (distance from eave to ridge), weather conditions (such as ice or snow) and architectural features, i.e. hips, valleys, dormers, parapet walls, etc.

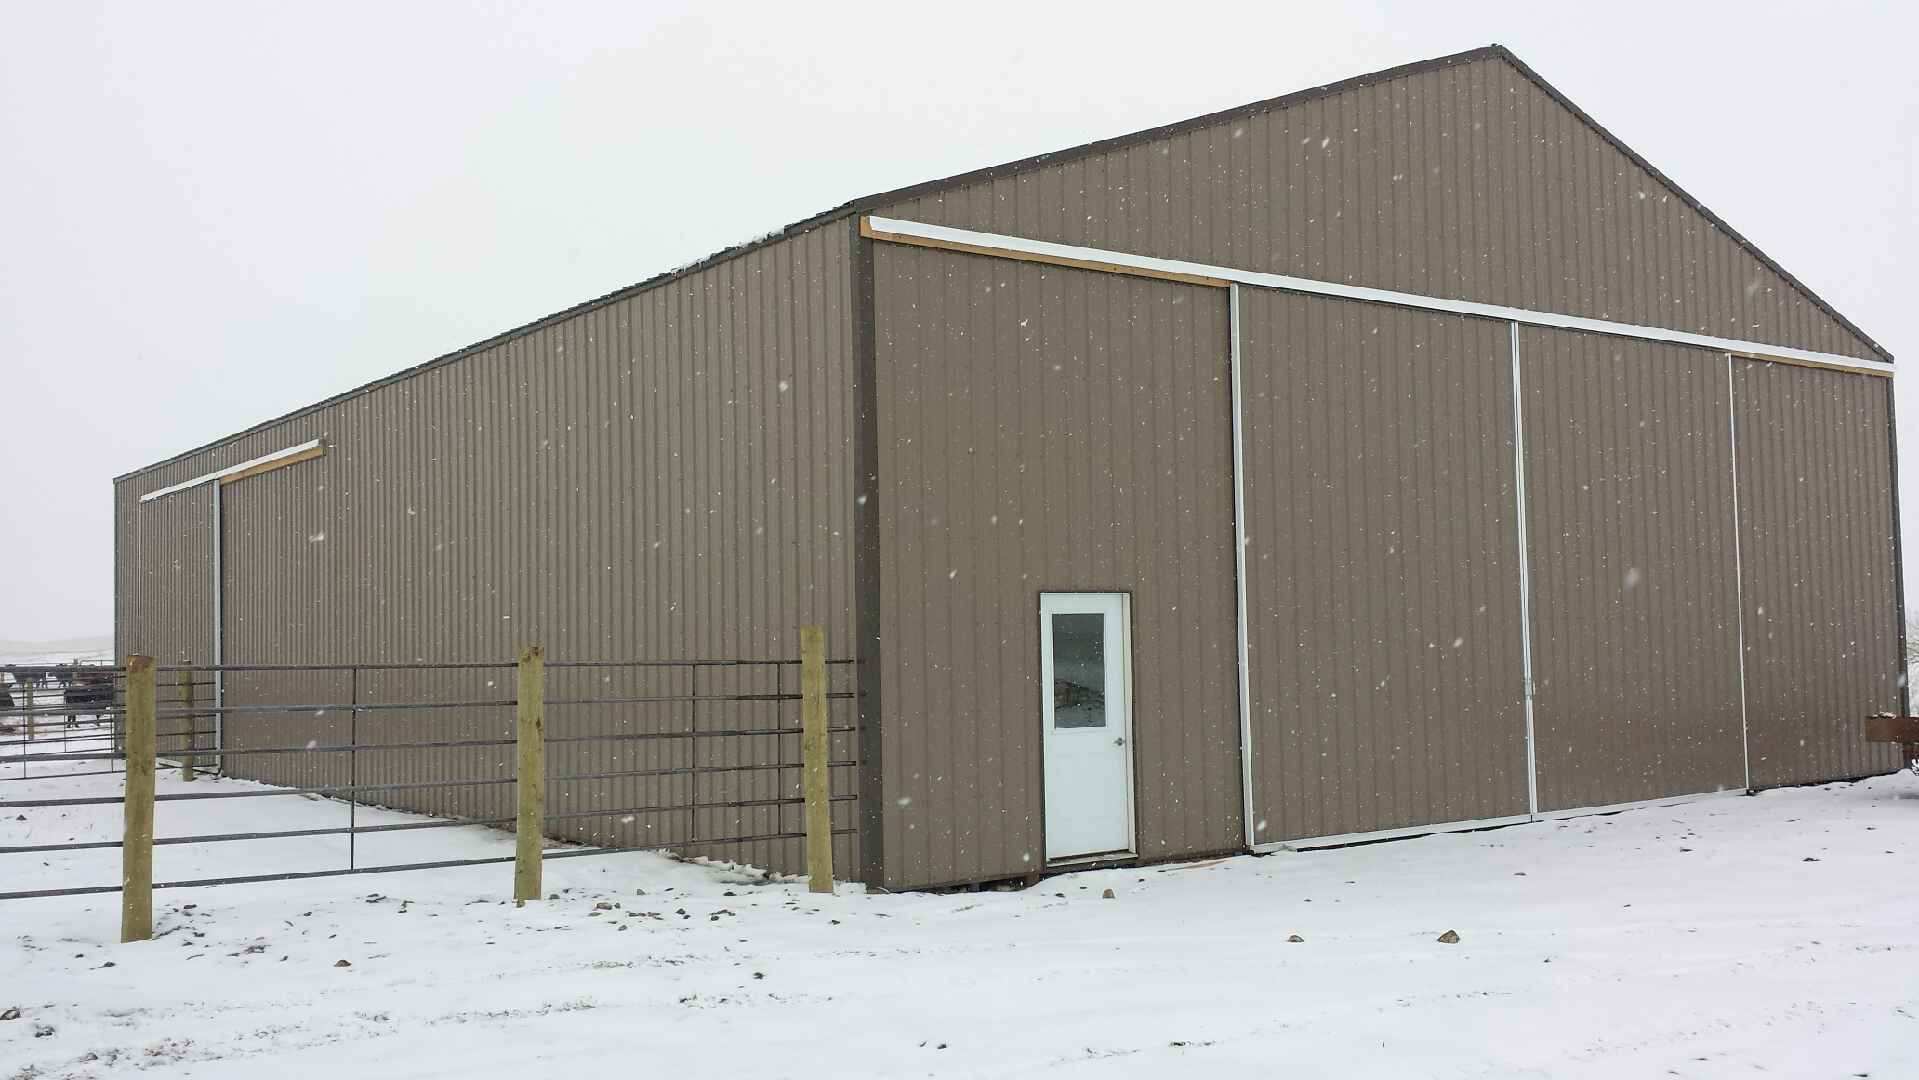
For instance, if your project has a roof slope of 1/2:12 you will need to ensure the product being installed is approved for this low pitch. In this case, you would likely use a “double lock” or mechanically “field-seamed” panel. You also want to ensure that all details are able to provide for a weather-tight seal even if temporarily submerged during a heavy rain. Field-seamed panels are also the best choice in areas that experience heavy ice and snow.

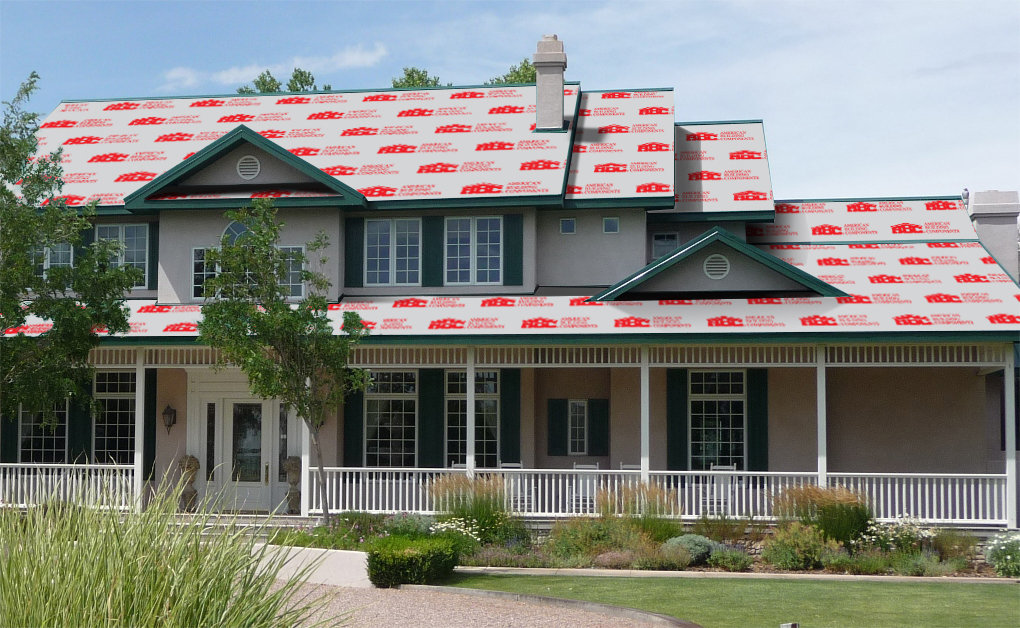
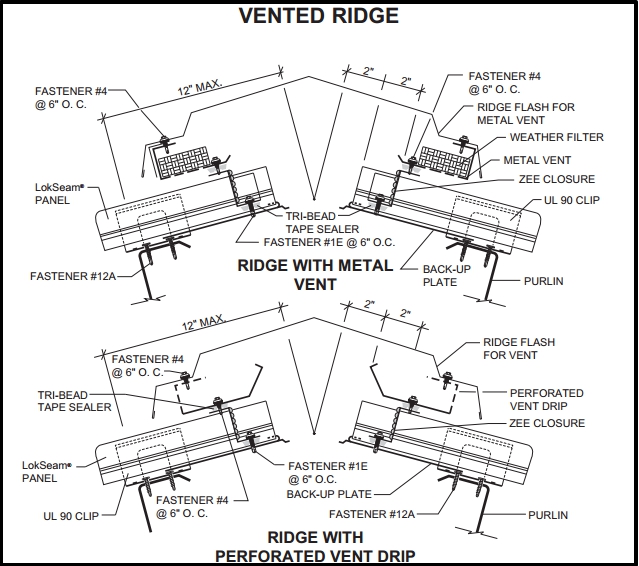
Additionally, it is imperative to recognize complicated design details that should be carefully specified and reviewed regardless of the roof slope. Design conditions that require special attention include: roof transitions, dead valleys, dormers, eave offsets, ridge offsets and offsets in parapet walls.

It cannot be overstated that you should always consult a metal roofing manufacturer about the capabilities of the standing seam metal roof system, including what warranties are available, prior to specifying it.

Browse the standing seam product manual for more information.

Design and testing

Familiarize yourself with wind uplift testing as prescribed by Underwriters Laboratories (UL-90 – 580 Test) and ASTM E-1592.

How to Help Prevent Oil Canning

Oil canning is defined as the visible waviness in the flat portion of a metal panel.  Oil canning is a visual issue, not a weatherproofing or performance issue.  However, building owners will complain about waviness in metal panels on roofs, walls, and perimeter edge metal.  Edge metal and metal wall panels are more of a concern than low-slope metal panels because edge metal and wall panels are visible from the ground.  Steep-slope metal panels and shingles are also visible, so awareness of potential oil canning is important.

Oil Canning on a Metal Roof

What Causes Oil Canning?

Oil canning can happen when unwanted stresses are introduced at fasteners, clips, and over purlins and uneven substrates.  Over-driven fasteners, clips that are slightly misaligned relative to the clip/seam interface, and too much insulation between the purlins and panels can introduce these unwanted stresses.  A misaligned panel or edge metal clip, certainly after the seam or drip edge is crimped tight, will add stresses to metal panels and edge metal

Tips to Help Prevent Oil Canning

  1. Place clips correctly: Setting clips in the proper location for edge metal and metal panels (roof and wall) is critical.  The clip needs to fit into a panel seam without forcing the vertical seam out of plane.  The clip needs to be aligned correctly and sized appropriately to not compress the vertical portion of the seam.  Clips that secure edge metal need to be positioned correctly so that crimping the drip edge won’t twist or bend the edge metal.
    Although not highly visible, low-slope structural panels can oil-can at clip locations and where insulation is draped over purlins.  Compressed insulation at purlins can “push back,” adding stress to the panel and resulting in oil canning.
  2. Consider the roof color: Sometimes oil canning is inevitable.  The color of the metal or coating won’t really make a visual difference, but darker colors panels will heat up more in direct sunlight.  This may make oil canning worse in some cases.  However, striations and small ribs (which also add strength) may help prevent or hide oil canning.
  3. Choose a thick metal: Metal thickness matters, so specify metal that’s as thick as possible to avoid oil canning.  Thicker metals are stiffer, so they may resist deformation due to unwanted stresses.  This reduces the chance of oil canning in edge metal and wall panels, which are most commonly smooth-surfaced.

For more information on oil canning and its causes, see the Metal Construction Association’s white paper on the subject, which can be found at www.metalconstruction.org.

Consider these ideas on your next job.

Snow and Metal Panel Roofs: Part 2


In part I of this blog, we discussed what to consider when deciding the roof material and roof slope to build with in snowy conditions. If you have decided to design a roof with metal panels, it is important to use the correct panel seams, evaluate the roof layout and consider long-term weatherproofing, and ensure your roof design fits the needs and function of the building.

Metal Building in Snowy South Dakota

Weathertight Panel Seams

For metal panel roofs less than 3:12 (i.e., low-slope roofs), the panel seams should be watertight. A watertight seam resists water intrusion, so snow on a roof should not become a leakage issue. For metal panel roofs with slope greater than 3:12, the steeper slope means liquid water (e.g., rain) drains very quickly off the roof. Because of this, many seams used for steep-slope metal panels are not watertight. Non-watertight seams can be problematic where snow stays on a roof. Architects should consider using watertight seams (e.g., double lock) and highly water-resistant underlayments in snow areas for all roof slopes.

Roof Layout

A designer should also consider the layout of the roof. Valleys collect snow. Valleys in which one roof area is significantly larger than the other (e.g., a dormer extending from a large roof area) are vulnerable to unbalanced sliding snow. A large snow slide can move across the valley and literally tear open the standing seams and displace panels.

Drifting snow can occur behind HVAC units, at perimeter walls and behind rooftop solar thermal and PV panels. Where a roof transitions from a lower low-slope roof area to an upper steep-slope roof area, snow will collect. Consider the potential snow load and entrapped moisture at these locations; the transition detail becomes critical to long-term weatherproofing.  And, depending on the orientation (e.g., north facing), areas with drifted snow may not see much sunlight, so snow is more likely to stay on the roof for a longer time.

Building Function

As the roof designer, design the building and site to account for the roof’s function. Many designers turn to snow retention devices to keep snow on roofs, especially above pedestrian areas, such as entrances and outdoor seating areas, or adjacent buildings.   Some of these devices rely on adhesive attachment to the panel, which means they rely on the adhesion of the paint to the metal. But physical attachment—e.g., snow fences clamped to the standing seams—is always a more confident, long-term approach than adhesive attachment when it comes to resisting shear/sliding loads. Using.multiple rows of snow fences, sometimes double in height, may be needed in areas that get large and prolonged amounts of snow (e.g., ski resorts), or where the eave to valley length is long, or where the slope is very steep.  Each increases the shear loads.

Designing a Snow Retention System

Snow retention systems need to be engineered, not guesstimated! Use online models to assist with designing snow retention devices. Input your snow load, roof slope, panel width, roof length (measured horizontally), overall width of the roof area, and the manufacturer and panel type. These inputs are needed to adequately engineer a snow fence assembly.  And remember, the snow loads are transferred from the fence to the panel seams, then to the panel clips and to the deck/structure.  The entire load path needs to be designed to handle the snow load.  Here is one model: http://www.s-5.com/calculator/index.cfm

For more tips on designing a snow retention system, read “The Art of Properly Specifying Snow Retention Systems.”

Designing a metal roof for snow is a mix of logic, experience and engineering. We can design roofs in snow because of our everyday observations of roofs with snow on them. Stay observant; design well.

Snow and Metal Panel Roofs: Part I

It’s February; winter storm Jonas happened last month. Snowstorms will continue to occur, and heavy snowfall can have many negative effects on roofs. What should you consider when designing a roof in snow areas, especially those with high snow amounts?

Rustic Trail Blog

What to Consider when Building Metal Roofs

Roofs on buildings in snow areas—from a structural capacity point of view—can be designed to be any low-slope or steep-slope roof system. Roof structures can be designed and built to accommodate any anticipated snow loads. From a weather-protection point of view, snow buildup on a roof can be problematic. The extra load and the risk of leaks are not desirable; however, keeping snow on a roof is often the acceptable way to deal with it.

Roof Slope

Unquestionably, the slope of the roof matters when it comes to snow staying on or sliding off. Once a roof slope gets to be about 45 degrees (i.e., 12:12), slope becomes the overriding factor for sliding snow. The amount of snow and the roof type also matter. From a designer’s perspective, there are also a number of localized issues to consider when designing for snow on roofs.

Snow Density

The amount and density of snow also matters. More snow means more weight. More weight means a greater sliding force down (along) the slope of the roof. On slopes less than 45 degrees (e.g., 6:12 to 9:12), a low coefficient of friction (such as on smooth pan metal panels) means less resistance to sliding. Striations and embossing add a small 3D profile and improve the resistance to sliding, especially if they run transverse to the slope.

When heavy, dense snow slides it can pack a punch. Such snow sliding down a roof can shear off exhaust vents; therefore, rigid vent pipes are needed, along with a secure method of attachment. Further, installing vent pipes as high up on the slope as possible reduces the amount of potential shear load. Consider the potential load on a vent pipe that’s 5 feet from the eave with a 40-50-foot eave-to-ridge length! Reverse that and most of the load goes away.

Roof Material Type

Material type and surface color make a difference, specifically a roof’s emissivity. Metal roofing absorbs heat more quickly and radiates heat more effectively than most other roofing materials. Darker colors enhance this effect. Even with as much as 3 to 5 inches of snow, UV light passes through it; less light passes the denser the snow. (The proof: solar energy panels [photovoltaics (PV)] work when covered in some snow.) This effect only happens on sunny days, and is most effective on south-facing roof areas. If there is heat loss from the building up through the roof, the heat will help melt the snow at the roof/snow interface. This creates a potential for sliding snow.

In part II of this blog, I’ll discuss the logic, experience and engineering that goes into designing a metal roof for snow. In the meantime, learn how to properly install snow retention devices, and watch how a New Jersey home heats and cools itself by gathering snow and rainwater.

Roofing Underlayment and Its Attachment Requirements

The International Residential Code (IRC) is commonly considered to be a prescriptive code, which means there are many requirements included that provide specific directions. Prescriptive-based code language provides a simpler method of enforcement for inspectors. And shouldn’t that be the case for one- and two-family dwellings, where well built and affordable is the goal?

Underlayment Requirements

In Chapter 9 of the 2015 IRC, the underlayment requirements for steep-slope roof coverings are included in three tables—material types, application and attachment requirements. Each table includes specific information for metal panels and separates out high-wind areas (defined as greater than 140 mph, and is only in the southernmost portion of Florida).

Roofing underlayment by our sister company ABC.

Material Type Requirements

Underlayment types for metal panels needs to only comply with manufacturer instructions. D226 and D4869 underlayments are viable options, as long as metal panel manufacturers allow them. And very importantly for metal panels, synthetic- / polymer-based underlayments are a viable option, again, as long as the panel manufacturer allows them to be used.

For metal panels in high wind areas, only D226 Type II and D4869 Type IV are allowed. In other words, only the heaviest materials are allowed in the highest wind zones.

Application Requirements

Simply put, underlayment should be applied according to the manufacturer’s installation instructions. For high-wind areas, specific application requirements are provided:

“For roof slopes from two units vertical in 12 units horizontal (2:12), up to four units vertical in 12 units horizontal (4:12), underlayment shall be two layers applied in the following manner: apply a 19-inch strip of underlayment felt parallel to and starting at the eaves. Starting at the eave, apply 36-inch-wide sheets of underlayment, overlapping successive sheets 19 inches, and fastened sufficiently to hold in place. For roof slopes of four units vertical in 12 units horizontal (4:12) or greater, underlayment shall be one layer applied in the following manner: underlayment shall be applied shingle fashion, parallel to and starting from the eave and lapped 4 inches. End laps shall be 4 inches and shall be offset by 6 feet.”

Underlayment Attachment Requirements

Underlayment should be attached according to the manufacturer’s installation instructions. For high-wind areas, specific attachment requirements are provided:

“The underlayment shall be attached with corrosion-resistant fasteners in a grid pattern of 12 inches between side laps with a 6-inch spacing at the side laps. Underlayment shall be attached using metal or plastic cap nails or cap staples with a nominal cap diameter of not less than 1 inch. Metal caps shall have a thickness of at least 32-gage sheet metal. Power-driven metal caps shall have a minimum thickness of 0.010 inch. Minimum thickness of the outside edge of plastic caps shall be 0.035 inch. The cap nail shank shall be not less than 0.083 inch for ring shank cap nails and 0.091 inch for smooth shank cap nails. Staples shall be not less than 21 gage. Cap nail shank and cap staple legs shall have a length sufficient to penetrate through the roof sheathing or not less than 3/4 inch into the roof sheathing.”

Self-Adhesive Underlayment Options

Of course, there are exceptions to these requirements. The first is to use a self-adhesive underlayment (i.e., ice dam protection) over the entire roof. The material needs to comply with ASTM D1970, “Standard Specification for Self-Adhering Polymer Modified Bituminous Sheet Materials Used as Steep Roofing Underlayment for Ice Dam Protection” and be installed per the metal panel manufacturer’s requirements. The code also points out that roof ventilation must be considered because a self-adhesive sheet is most often an air barrier and a vapor retarder. Concerns with moisture are quite relevant when these types of materials are installed over the entire roof deck. The second exception is to tape the seams of the roof deck with 4-inch wide strips of D1970 material, and then cover the deck with underlayment. The second exception is not widely used, except when trying to reduce, or eliminate, air flow through the deck while allowing moisture to escape.

IRC Requirements for Attaching Metal Panels

The IRC also includes some, but not many, requirements for the attachment of metal panels. The IRC requires metal panels be attached per manufacturer’s installation instruction and “be secured to the supports.” This implies fasteners should be attached to purlins or rafters, but one could easily argue the roof deck is the support for the metal panels. However, the IRC does provide specifics for fasteners used to attach metal panels, but the following is only applicable if manufacturer’s instructions don’t include fastener requirements. The IRC states:

“In the absence of manufacturer’s installation instructions, the following fasteners shall be used:

  1. Galvanized fasteners shall be used for steel roofs.

  2. Copper, brass, bronze, copper alloy and 300-series stainless steel fasteners shall be used for copper roofs.

  3. Stainless steel fasteners are acceptable for metal roofs.”

The Importance of Following IRC and Manufacturer Instructions

The IRC is a prescriptive code and there are many specific requirements for underlayment and metal panels. But because of the wide variety of styles, the IRC appropriately requires installation according to manufacturer’s instructions. It’s important to specify a new roof using both manufacturers’ instructions and IRC’s specific requirements. And, remember, a metal roof will have a long service life, so the underlayment’s service life should equal that of the metal roof. Don’t be shortsighted when designing for longevity.

Ventilation for Steep-Slope Roofs

Ventilation

Ventilation can be a confusing topic.  What is the purpose of ventilation?  Is ventilation required for all types of roofs?  What do the model codes require?

What is Ventilation?

Ventilation, when done properly, removes heat and moisture from traditional attics and from rafter spaces.  The removal of heat and moisture is necessary for buildings to operate efficiently and not deteriorate prematurely.  Ideally, an attic should be the same temperature and have the same humidity level as the exterior.  Convective ventilation—natural air flow from eave to ridge—means air comes in at the eaves and is exhausted at the ridge, taking the heat and moisture with it.  Importantly, ventilation is outboard of the insulation layer for the home or building.

Ventilation Requirements

The IRC and IBC have very similar requirements, found in the 2015 IBC, Section 1203 and the 2015 IRC, Section R806.  Ventilation is not tied to the type of roof system installed, as some believe.  Because ventilation improves the overall performance of a building, regardless of roof type, ventilation is required when steep-slope metal roofs are installed.

The amount of ventilation is based on the floor area of the attic.  The ventilating area should be at least 1/150 of the floor area.  Ventilation amounts can be reduced to 1/300 if half of the ventilation is at the eave and half at the ridge.  This allows the convective flow to work efficiently, allowing the reduction in the total ventilation amount.  In climate zones 6, 7, and 8 (i.e., the northern third of the US), an air barrier is required at the ceiling level in order to use the reduced amount of ventilation (i.e., 1/300).  A vapor retarder reduces the amount of moisture that can accumulate in the attic space; therefore, less ventilation is needed and required.

Because the model codes discuss ventilation only for attics and enclosed rafter spaces, the requirements are necessary only for steep-slope roofs.  Low-slope roof systems are not installed over attics or cathedral ceilings; therefore, the requirements for ventilation aren’t triggered when a low-slope roof is installed. Not because of the low-slope roof, but because there isn’t an attic or a cathedral ceiling.

Is ventilation in your scope of work?  In nearly all situations, the metal panel installer will install the ventilation components at the ridge.  And, unless the ventilation at the eave can remain in place, the installer should take the opportunity to install the ventilation components at the eave.  Eave ventilation can easily be made of metal, and can be an “add” to your scope of work for new and replacement roofs.

Understand ventilation requirements, improve long-term performance, and expand your scope of work.

Fall Maintenance for Metal Roofs

Yes, it is still summer, but it is not too early to start thinking about fall maintenance.  The sooner you contact your network of building owners, the sooner you’ll be able to schedule and get paid for performing maintenance this fall. MBCI's Stormproof Panel

Do You Have Maintenance Agreements in Place?

Let’s take a step back. Why don’t you have a maintenance agreement in place for every roof you’ve installed?  Think “car dealer” for a minute.  When you buy a brand new car at a dealership, you’re basically expected to get it serviced there for the life of the car, or at least while the warranty is in effect.  Car dealers have the knowledge and expertise, and car owners rely on that expertise.  It’s the same idea for metal roofing.  As the installer (and perhaps designer) of a complex, highly engineered metal panel roof system, you are uniquely qualified with the knowledge and experience to provide semi-annual maintenance and inspection.

How Often Should You Service a Metal Roof?

The roofing industry continues to extol the virtues of semi-annual maintenance.  Even though roofs don’t have moving parts (like an elevator or an AC unit), a roof moves because it expands and contracts with temperature changes.  This movement puts stresses on all seams and joints.  High winds induce significant stresses at seams and fasteners, too.  Debris can collect on the rooftop and in gutters.  Fasteners and seams can become loose or damaged.  Regular maintenance can correct these minor issues before they become major issues.  Regular maintenance can also find potential warranty issues, such as a paint or coating issue.

Start Setting Up Service Contracts

Because fall is around the corner, it’s time to start contacting your network of building owners to set up a service contract.  Some companies may take a couple months to approve a service agreement, so an early start matters.  A service agreement should define the parties involved, the services included, and the fees.  Fees can be based on the square footage of the rooftop, and perhaps can include travel time and mileage expenses.  Service agreements can be a one-time contract, or, preferably, a multi-year contract, with annual increases included.  To help sell a service agreement, let your clients know that most, if not all, manufacturers’ roof warranties require annual maintenance.  If you don’t have a service agreement form for your company, many examples of “roof system service contract” can be found with a Google search.

There may not always be opportunities to install new metal roofs, but there will always be opportunities to service existing metal roofs—twice a year for every metal roof.

Details, Details, Details

Water runs downhill.  And, gravity is our friend.  Yet sometimes we forget these basic concepts when installing metal panel roofing.

When it comes to metal roofing details, a contractor should always think about the flow of water.

Roofing contractors are in the business of controlling water, so let’s install details that allow water to run downhill and let’s use gravity to our advantage.  A more precise way to say it: Implement drainage details that don’t buck water!

Details, details, details

Defending Against Water Leaks

Metal roof penetration and edge details should not rely on sealant as the primary defense against water leaks.  Certainly, sealant is and should be used as a secondary measure against water leaks.  Consider this: A transverse panel seam is created by lapping the upper panel over the lower panel, and sealant is used as a secondary seal.  Installers would never reverse the lap of a transverse seam (where the lower panel is on top of the upper panel), bucking water and relying only on sealant to keep water out.  A penetration detail (e.g., a vent stack or roof curb) should use the same logic.  There’s no doubt that bad details are rooted in low cost and speed of installation, but those are not details that are going to have equal service life to the metal panels on a roof.  A penetration detail is as critical to the long-term success of a metal roof as a transverse seam.

Prefabricated Penetration Details

It’s best to use prefabricated penetration details that have welded or soldered weathertight seams.  The prefabricated piece should be the width of a panel and include the male and female seams, and be seamed into the adjacent panels.  And just like a typical transverse seam, the top edge of the prefabricated piece should be under the upper panel, and the bottom edge of the prefabricated piece should be above the lower panel.  Water is not bucked and seams are fully intact.  That is a long-term penetration detail.

Where proper overlap can’t happen, redundancy is necessary.  A small pipe penetration detail should use a rubber roof jack with added levels of redundancy for weatherproofing.  First, the roof jack should only be installed in the flat of the panel; sealant tape should be installed between the panel and the roof jack; and closely spaced, gasketed fasteners should be installed to create compression on the sealant.

Roofing That Lasts

Metal roofs sell themselves because metal is long-lasting.  And construction details need to be developed and installed with that in mind.  Metal panels don’t leak—the joinery and fastener locations can leak.  Remember to design and build details that have equivalent service life to the panels themselves.  Proper laps are critical, and remember, gravity is our friend.

To learn how to design a roof system that prevents possible infiltration and allows for proper water runoff, take MBCI’s AIA-accredited course, The Devil is in the Details.

The Right Team Holds Your Standing Seam Roof System Together – Part 2

Blackridge Elementary features LokSeam

In my previous post, I talked about the important process of selecting the right materials and appurtenances for your standing seam roof system and how they should be used together for the best result.  There are three more parts of the standing seam roof system that, if used, must be carefully specified.

Pipe Penetrations.  Plumbing vents, heater flues, exhaust fans and pipe supports for equipment racks are all typical penetrations seen on metal roofs. Always specify rubber roof jacks for these penetrations, and use high temperature silicone rubber roof jacks on pipes that will be hot. Do not allow the use of residential type roof jacks, such as those made of plastic or lead, or the EPDM roof jacks made for single ply roofs.

Use pipe instead of square tubing to penetrate the roof when designing an equipment rack for rooftop equipment. Otherwise, there will be no good way to seal it to the roof. Pipe penetrations should always penetrate the roof in the middle, or flat part, of the panel, not through the seam itself. Ignore this advice, and you’ll probably have a roof leak on your hands.

Large diameter pipes may restrict the drainage of water. A good rule of thumb is to ensure that the base of the roof jack fits completely in the pan of the roof panel. If it will not fit, install a stack flashing in the roof at the proper location and attach the roof jack in the stack flashing. Stack flashings install into a roof just like a roof curb, but they are flat in the middle and don’t have the opening a curb does. This provides a large flat area in which to install the roof jack with room for water drainage.

Crickets. The roof design may at times require a cricket be installed to divert water around a parapet wall. And if the specifications or architectural drawings are not clear as to the proper treatment of this area, the roofer will make the cricket out of sheet metal.  However, crickets should always be made out of welded aluminum or stainless steel. This allows you to have a cricket that fits and leaves no pinholes or laps that are sealed with caulk. Sunlight will eventually break down exposed caulk and may cause a leak. But when properly built and installed, a welded cricket will perform throughout the lifetime of the roof.

Snow Retention Devices. When these devices are required on a standing seam roof, never use a through-fastened device. When through-fastened devices are used, they are either installed into the secondary structural, which prevents the roof from floating, or they are installed into the roof panels only, which makes for a very weak connection that will eventually work loose, leaving holes in the roof.

The best snow retention devices utilize a clamp that locks onto the panel seam and does not perforate the roof membrane.

Keep in mind that if snow conditions are severe enough to warrant retention devices at the eave, you will also need to protect pipe penetrations as well. Many unprotected plumbing vents are broken at the roof surface from moving ice and snow.

Remember, the roof system is called a system for a reason. For a successful roof installation, all rooftop accessories should be considered. Well defined specifications and details should be provided and adhered to so everyone involved in the project knows what is expected and can bid the project accordingly.

The roof installation process will be more efficient, leak problems will be avoided and the “final inspection” will be painless. Who doesn’t want that? The end result will be a total roof system that looks good and performs well for decades to come.

The Right Team Holds Your Standing Seam Roof System Together – Part 1

The architect, roof manufacturer and roof construction installer are parts of a team that can work together like a well-oiled machine to get the best result – a professionally installed roof that looks beautiful and will last for decades.

I now invite you to think of your metal roofing system as a “team” in the sense that all parts must work effectively and efficiently together like pieces of a puzzle to function optimally as designed. A well-thought-out process puts the right combination of materials together in the right way to produce an optimum roofing system.

The process requires identifying a reputable manufacturer of standing seam roofs – one that meets your specific performance and aesthetic needs, and that provides the required warranties. Once chosen, the designer may think, “Voila! Mission complete,” when in fact, the process is just beginning.

BattenLok and LokSeam
Mitchelle Elementary School features BattenLok HS and LokSeam


Since metal roofs are being used in increasingly more complicated designs, the roof panels and related accessories that attach the roof to the substructure are a part of the total roof system. The added roof curbs, pipe penetrations, crickets, snow retention devices and lightning protection equipment all become part of the standing seam roof system.  And it really matters how each of these items attach to the roof.  Though it sounds logical to do so, don’t leave it up to the roofer or another tradesperson to decide how these items will be installed.

Take control and make sure the following are adhered to when specifying a standing seam metal roof system:

Do not use dissimilar materials.

 Copper, lead and graphite can all cause galvanic corrosion. Even water dripping from these materials onto the roof can cause it to corrode. And manufacturers’ warranties are often void if this situation exists.

Some examples: Copper lightning arresting equipment is a typical use of dissimilar material found on Galvalume roots. Use aluminum instead. Lead hats are often found on Galvalume roots. Rubber jacks can be substituted.

Compile a qualified list of acceptable curb manufacturers. Choose only those that use aluminum or stainless steel. Many curb companies use Galvalume, which seems reasonable since most standing seam panels are made from this material. But when Galvalume-coated steel is welded, the Galvalume-coating melts at the weld. Even when a coating of corrosion inhibitor is used, it will never be as good as the uncontaminated Galvalume coating.

You also want a curb manufacturer that offers a weathertightness warranty if required for the roof. Roof manufacturers will generally warrant the attachment of the roof curb to their roof panels, but it’s up to the roof curb manufacturer to warrant the construction and performance of their product.

Be careful with roof curbs.  First off, they should be “shingled” into the roof. This way, all laps shed water as it drains from the roof. Curbs that lap on top of the roof panels on the upslope side will cause problems.

Roof curbs must allow plenty of room for water to drain around them without building up a waterhead at the upslope end.  Provide clearance on both sides of the curb and a long flange on the upslope end so the roof panels can lap onto the flange and maintain a 12” upslope from the top of the water diverter built into the curb.

Finally, if AC units will be placed on the roof, include PVC condensate lines to carry the water off of the roof. Never allow the condensate to drain directly onto the roof. The dissolved copper ions which will cause galvanic corrosion of the roof panels.

This is a lot to consider, possibly more than you thought was involved. Well friends, there’s even more. I’ll explore this even further in my next post.

In the meantime, learn more about MBCI’s rigorously-tested, standing seam metal roof systems and how it’s one of the most durable and weathertight roof systems available in the industry.

Find a sales representative