Best Practices for Ensuring Metal Roof Accessories are Properly Installed

Best practices for roofing contractors, general contractors…and even architects—from spec’d work to pre-roofing conferences.

Many metal roofs have roof penetrations for accessories installed by other trades. Unfortunately, oftentimes, these penetrations are improperly made or the accessory material is incompatible with the standing seam roof. A properly installed Galvalume standing seam roof, for instance, can be expected to last 60 years or longer. However, improper work on the roof by other trades can result in leaks and possibly a roof service life far less than 60 years. In order to achieve the best results, the roofing contractor needs to coordinate with the general contractor, the architect, and the building owner to ensure proper installation.

In most cases, it is the roofing contractor who is held responsible for all things roof! If armed with a clear checklist as he or she walks into a pre-roofing meeting with the architect, there will be a significantly greater likelihood of a well thought out and successful process. Here are some suggestions for the roofing contractor (in conjunction with the entire team) to consider.

  • A reminder to specifiers to put in the project specifications that all roof penetrations and roof accessory installation must be coordinated with the roofing contractor. Beyond the obvious issue of maximizing performance, if a manufacturer’s weathertightness warranty is specified, the roof manufacturer must preapprove any work performed on the roof by other contractors.
  • If the above is not in the project specifications, the roofing contractor should initiate the conversation during the pre-roofing  conference with the architect and the general contractor.
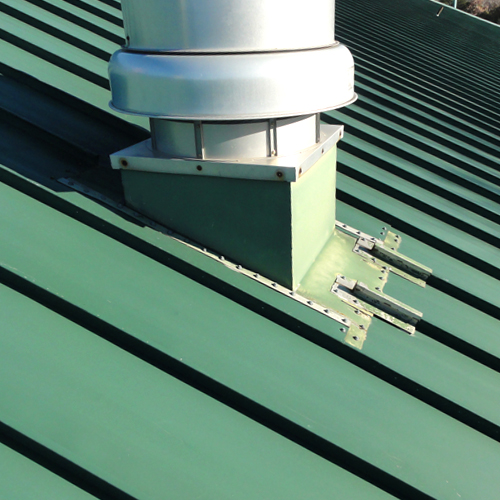
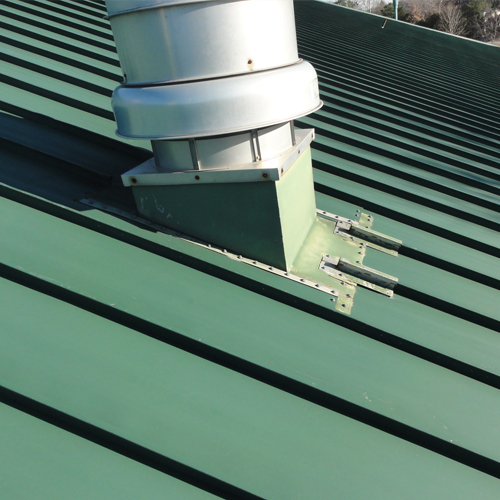
  • Roof curbs should ideally be supplied by the roofing contractor and they should definitely be installed by the roofing contractor. Welded aluminum curbs should be used as specified by the roofing manufacturer. See tips for installing roof curbs, here.
Best practices
Be sure to use the proper roof curb to ensure a well-installed, weathertight condition.
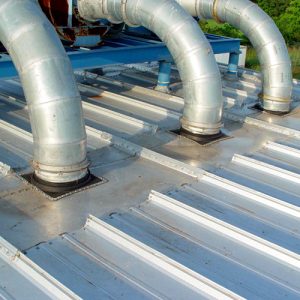
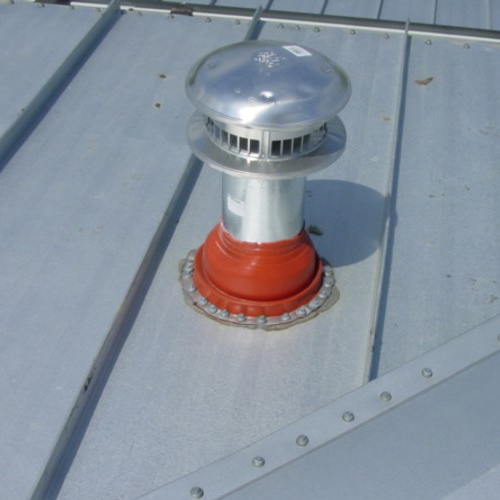
  • Pipe penetrations for vent pipes, heater flues, gas and electric, etc. as well as penetrations associated with lightning protection air terminals and cable management should be coordinated with the roofing contractor and with the roofing manufacturer if there is a  weathertightness warranty. Rubber roof jacks should always be used.
Best practices
The above example is a high temperature rubber roof jack. Pipe penetrations allow for a long-term performance of the roof.
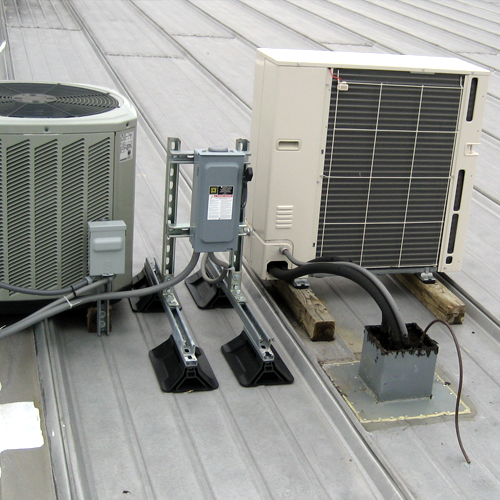
  • Ensure that dissimilar materials such as copper, lead, and graphite are not used on the roof. This includes treated wood, which contains copper. Condensate from roof top AC units must be piped off the roof as it contains dissolved copper.
Best practices
This is an example of wood and HVAC condensation on a metal roof.
  • The roof must be protected from spills of any harmful chemicals or masonry products.

The above represents just an overview of some of the best practices the roofing contractor should consider when entering into a job with other trades. As the roofing contractor, anything that involves the roof will likely be seen as YOUR purview. After all, if there’s a leak, who are they going to call? That said, being proactive regarding roof accessory installation—regardless of who is doing the actual work—will serve all parties in the end. Get in front of any potential issues and ensure everyone is reading from the same playbook. For more information, contact your local sales representative.
The Importance of Roof Installer Training and Certification

Many metal roofing installers may think that their years of experience on the job is enough. But even for those who have been putting up metal roofs for a long time, the truth is that if they haven’t put up a particular brand’s roof before, they need to go through that manufacturer’s installer training and get certified. There are several reasons for this.

  • More and more, architects are starting to specify that an installer must be certified by the manufacturer of the product being installed.
  • For many manufacturers, including MBCI, in order to get a Standard III warranty with no dollar limit—or any Day One warrantytraining and certification are required.
  • Installers need to know the proper technique and protocols—for a particular manufacturer’s product! After all, you don’t make any money by going back and fixing leaks.

There are many other standing seams that are very similar to those that MBCI sells, and while they may look similar, there will be a number of small differences, such as the way panels are notched or the way sealants are put in. Even the way companies test panels can be different. For instance, if you have a Florida or Dade County approval or an FM approval, that’s all tied into the way the roof system is tested. So, if someone has a project where one of those things is required, it is imperative to make sure the installer is using that brand’s system of doing things, down to every last detail. These are some of the things covered in certification courses.

Certification Courses and Installer TrainingInstaller Training

At MBCI, we offer a three-day course that covers all of our standing seam panels, and have a separate two-day course for insulated metal panels, which provides advanced installer training in metal roof installation through classroom lecture and hands-on application in a variety of MBCI’s products, assembling roof systems on a mockup to reinforce what was learned from the presentations. Courses take place once a quarter in different locations throughout the United States.

In terms of who should attend certification courses, generally speaking, it’s the person from the company who will be doing the actual work since a certified installer needs to be on the roof any time any work is being done on the roof. He or she is the one we train. And that installer is tied back to the company in order for them to receive certification. That company has to have workman’s comp and general liability insurance. If the certified person leaves the company to go elsewhere, the first company needs to certify someone else.

The Bottom Line of Certification

From a bottom line perspective, it’s important for companies to be proactive in making sure there is always someone on their team who is a certified installer for the products they use—or might use. Not only will they learn tips and tricks for proper installation, but it will also avoid a situation where you have a job, the panels are being delivered the next week and you realize you need someone to be certified. Maybe it’s three weeks until the next certification opportunity. You’ll want to have all that settled before you need it.

Just because you’ve been installing roofing for 30 years, doesn’t mean installer training and certification isn’t necessary. Our best advice is to come to the class and learn all the little idiosyncrasies about whatever manufacturer’s roofing panels you’ll be installing. This is a case where even a little knowledge goes a long way.

Ventilated Metal Roofing Systems

Metal roofing is commonly installed on residential or light commercial buildings, where longevity and aesthetics are a priority. When those buildings are wood framed or use roof sheathing, the desired results can still be achieved, as long as some basic guidelines are followed. One of the most fundamental items to address is making sure that the roof system is properly ventilated in a manner that works with the rest of the building construction. Let’s take a look at the two most common means to achieve that.

Ventilated Attic:

Conventional residential roof construction typically involves a trussed or rafted roof system with insulation installed along the ceiling line and a ventilated attic above it. The premise here is that the ceiling is sealed tightly to prevent any conditioned air from entering the attic, but if it does, then any moisture in that air is ventilated out of the attic, preventing any build up and potential damage.

The most effective way to ventilate an attic is with continuous vents along the soffits and a corresponding continuous vent along the ridge. The International Residential Code (IRC) recognizes this approach and provides the formulas for determining the proper amount of net free vent area (NFVA) required for the total roof assembly. It then goes on to state that 50 percent should be split between the ridge vent and 50 percent along the total soffit area. Some building experts suggest, however, that 60 percent along the ridge and 40 percent along the soffits will provide a slight pressurization of the attic and help with the desired proper venting flow.

Either way, the overall intent is to create a situation where outdoor air is moving freely in through the soffit vents and up through the ridge vent. The continuously moving air then helps keep the roof sheathing, and the roof cooler than it would be when compared to sitting in the sun without the ventilation – on the order of at least 2-3 degrees Fahrenheit.

Ventilated Roofing:

Not every roof system is built with an attic and insulated ceilings. Sometimes, the roof deck defines the building enclosure either in the form of an upper floor ceiling or as a cathedral-style ceiling and roof system. In some of these cases, insulation may be installed between the roof framing which still requires ventilation between the roof sheathing and the insulation on the order of an inch minimum of air space (2 inches preferred), as in an attic.

In other cases, the insulation may be rigid foam that is installed above the roof deck or sheathing. Here, the insulation needs to be thick enough to keep the exposed ceiling warm and prevent any condensation inside the structure. The International Energy Conservation Code prescribes the minimum R-values of insulation based on climate zones, and typically, the required amounts for energy control also assure condensation control.

Ventilated
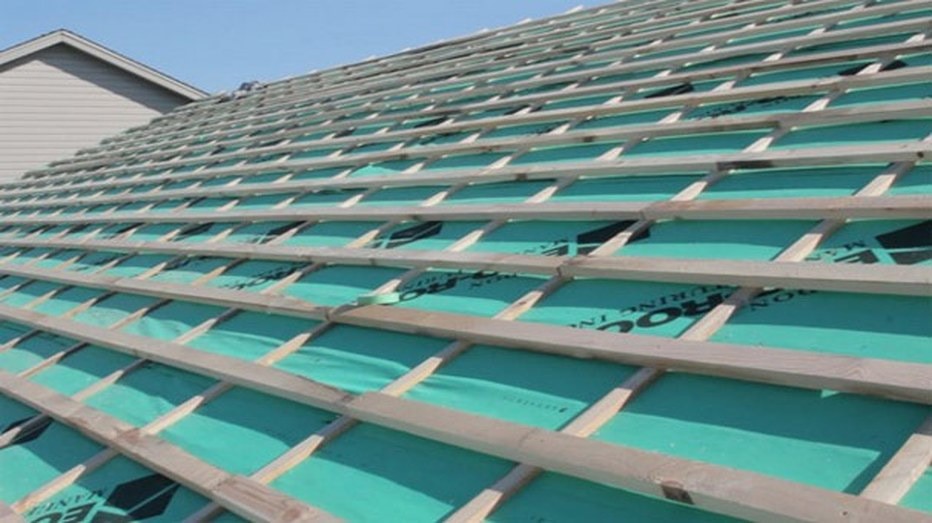
Above sheathing ventilation (ASV) is achieved by having continuous air flow between the roof sheathing and the metal panel system.

Nonetheless, if a layer of wood sheathing is placed directly on the insulation and then the metal roofing placed directly on top of that, the metal roofing will tend to get warmer in the sun than in a ventilated condition. Therefore, metal roofing manufacturers often recommend providing an air gap between the metal roofing and the sheathing. This is achieved with furring strips ran vertically to assure air flow, and then run horizontally to support the roof. The spacing and details of these supports should be determined by a structural engineer who can perform the needed analysis and calculations, taking into account the panel strength and imposed loads from snow, wind, etc.

Is this approach effective? A series of studies undertaken at Oak Ridge National Laboratory and sponsored by the Metal Construction Association has determined the answer is yes. These studies used a common asphalt-shingled roof without any ventilation above the sheathing as the control case. Then different versions of a metal roofing system with ventilation between the sheathing and the roofing were tested and compared to each other and the asphalt-shingled roof. The results found that “all test roofs were highly effective in reducing the heat flows through the roof and ceiling, and in reducing the diurnal attic temperature fluctuations.” (References below)

Clearly, paying attention to ventilating the roofing system, regardless of the type of construction, can make a difference in the overall performance of a roof. To find out more about ventilated roofing systems for a current or upcoming project, contact your local MBCI representative.


References:

Performance Evaluation of Advanced Retrofit Roof Technologies Using Field-Test Data – Phase Three Final Report

Authors: Kaushik Biswas, Phillip Childs, Jerald Atchley

Volume 1 Published: May, 2014 ORNL/TM-2014/141

Volume 2 Published: January 2015 ORNL/TM-2014/346

Prepared by OAK RIDGE NATIONAL LABORATORY

Oak Ridge, Tennessee 37831-6283

Managed by UT-BATTELLE, LLC for the U.S. DEPARTMENT OF ENERGY under contract DE-AC05-00OR227

The Case for Day One Weathertightness Warranties

Once upon a time, a “standard warranty” was indeed the industry standard for weather tightness warranties in the metal roofing realm. To make a long story short, this meant that manufacturers supplied a “manufacturer’s standard warranty” based on an initial review of the details to ensure that the roof could be properly installed but left it up to others to ensure that the details were followed. If the roof was not properly installed and resulted in a leak then the manufacturer’s warranty did not cover it. At this point, the project had been closed out and the installer was long gone, sometimes even out of business. The owner, architect, general contractor, installer and manufacturer were then at odds with each other leading to dissatisfaction and frustration all around.

Warranty Evolution

In the mid ’90s, the Single Source or Day One warranty was born and quickly caught on throughout the metal roofing industry. Generally, this warranty required that the roofing contractor come to the manufacturer’s training course to be trained in the proper installation of their roof system(s). In addition, the manufacturer typically required inspections at the beginning, middle of the roof installation with a final inspection just before the crew demobilized from the project. Once the warranty was issued, the manufacturer was responsible to the building owner from the date of substantial completion for the weathertightness of the roof. To be sure, there are still terms and conditions to the warranty, just like with any type of product warranty. For instance, the warranties don’t cover leaks caused by natural disasters or damage caused by other trades on the roof. These warranties provide very good coverage and the best part is that the inspections greatly reduce the chance of a leak in the first place, which is what any building owner would want.

Warranties
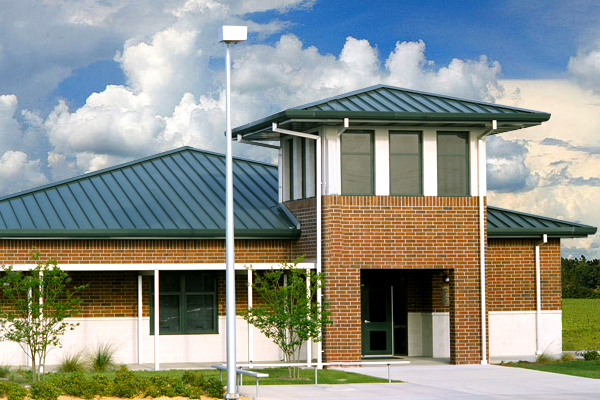
Chain of Lakes Elementary School featuring Hunter Green SuperLok® Metal Panels

There is an overwhelming agreement on all sides that the evolution toward the Day One warranty has been a good thing for the industry. It has forced installers to do things right from the outset and has compelled manufacturers to come up with good, clear details for some of the more complex architectural elements that architects want to use such as dormers, hips, etc.

Conclusion

Manufacturers all want their roof installations to go smoothly, to look good, be trouble-free and perform as expected for many years. To that end, they are willing to work with specifiers, roofing contractors and others to provide assistance, training and job specific help as needed. To ensure that the roofs are properly installed, the specifiers and contractors need to work together with the manufacturers to ensure good communication about the requirements for the specific project and what each party needs to make the project successful.

Tips for Installing Metal Roof Curbs

Metal roofs made from galvalume-coated steel provide great corrosion resistance and can readily satisfy a 20-year weather-tightness warranty. However, when a large penetration in the roof is needed, such as a large exhaust fan or other equipment, the integrity of the roof can be compromised if not addressed properly. The common method of dealing with large penetrations (i.e., spanning over one or more standing seams) is to install roof curbs that form the transition between the roof and the equipment being installed.

Of course, like most aspects of building construction, there are choices available in materials, methods, techniques, and styles of installing a roof curb. When the key objective is to provide a curb that will perform for the entire life of the standing seam roof, there are four key points to keep in mind.

Roof Curbs
Roof Curbs for Standing Seam Metal Roofs

Pick the Proper Material:

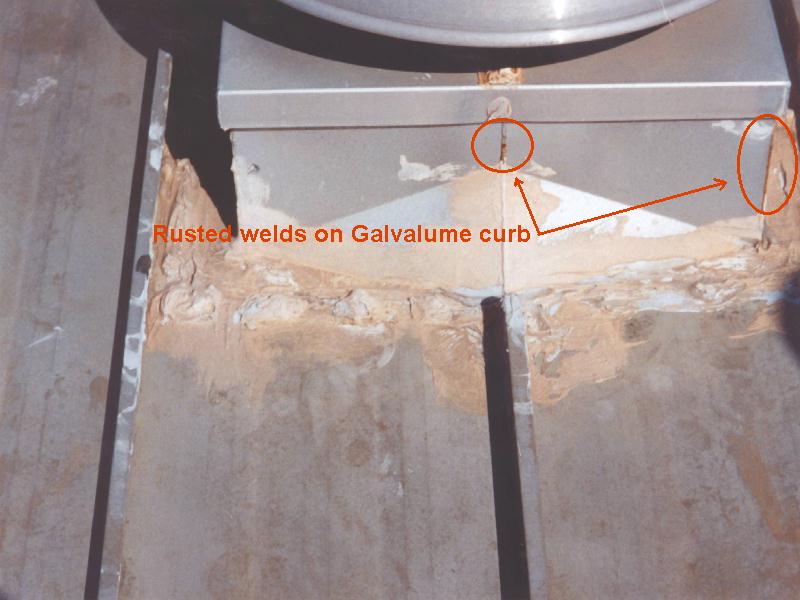
A galvalume-coated roof doesn’t mean that a galvanized steel roof curb is the best thing to use – in fact, galvanized roof curbs are known to rust, corrode, and leak, particularly along weld joints, as soon as a year after installation. Instead, a curb made from aluminum (preferred) or stainless steel should be used to prevent premature corrosion. To put any concerns about dissimilar materials and galvanic corrosion to rest, keep in mind that galvalume is approximately 80 percent aluminum by volume, so they are highly compatible.

Rusted Roof Curbs
Rusted Welds on a Galvalume Roof Curb

Use the Proper Roof Curb Type:

It is not uncommon for a roofer to choose a curb type referred to an an “over/over” curb, meaning that, after the opening is cut, the curb is installed over the roofing on both the upslope and the downslope sides. This might be the easiest to install during construction, but it will very likely create more work and callbacks when the upslope side starts to get water into or under the joint, and leaks. Instead, it is well worth taking a few extra minutes to install an “under/over” curb, which places the upslope side under the roofing in a true shingled lap between the curb and the roof. This way, the upslope edge is much more protected and less likely to leak using the same shingled condition occurring on the downslope side – all creating a properly water-shedding, weathertight condition.

Provide the Proper Water Flow Clearance:

We all know that water seeks the path of least resistance, so the key to keep water flowing down a roof is to avoid creating pockets of resistance. This is particularly true on the upslope end of a curb as well as on the two sides parallel to the slope of the roof. A curb with a minimum clearance of 12 inches between it and any other object on the upslope end will give water enough room to flow around the curb easily. Similarly, once the water reaches the two sides, at least 6 inches of free clearance is needed (i.e., without being encumbered by standing seams or other features) to allow the water to keep going and not back up to create a water head at the upslope end of the curb. Simply put, clearance means free-flowing drainage; lack of clearance can mean water buildup and leaks.

Install Roof Curbs Rib to Rib:

Installing curbs that rest in the flat, lower, panel area of metal roofing invites water tightness problems since the curb now has to be installed and sealed in the most vulnerable area – the surface where rainwater flows. Instead, coordinating the curb size with the rib spacing to provide a rib-to-rib curb eliminates fasteners down both sides of the curb in the pan of the roof panels. Placing the curb on and attaching it to the ribs also allows better transitioning from under the roofing on the upslope end to cover the roof on the downslope end. This type of curb has the added benefit of being able to be installed either during the roof installation of after the roof is finished.

Taking these four points into account in your next metal roofing project where roof curbs are required will help assure a well-installed, weathertight condition that should last just as long as the metal roofing system itself.

Evolution of the Metal Building Components Industry

Metal building components have been in use ever since iron and steel became commonly available during the 1800s. However, coordinated metal building components as we know them today really got their start during the 1900s, with a lot of significant developments happening just in the past 40 years. Here’s a quick overview:

1970s:

During the 1970s, the emerging metal buildings industry was primarily focused on providing pre-engineered solutions for commercial, industrial, and agricultural customers, mostly in the range of 10,000-square-foot buildings or less. The use of lighter-weight, tapered-end steel sections and bolted end-plate connections was beginning to be developed for widespread use, based on industry research. The development of technology that allowed for new methods of steel fabrication created growth for existing companies and helped new ones to form, such as MBCI in 1976. The energy crisis of the time brought interest in creating better insulation solutions.

Metal Building Components Plant Location
MBCI Lubbock, Texas Plant

1980s:

This was a period of growth along with the rest of the construction world. New plants and facilities were opening up in response to growing customer and market needs. New coating technologies were coming available that provided  better corrosion resistance and allowed for more customers to consider using metal buildings. Technical research into wind loading for walls and wind uplift for roofs brought updated means and methods to address these critical structural engineering conditions.

1990s:

During this decade, the volume of metal buildings and tons of steel processed nearly doubled. More building types were being constructed out of metal building components as architects, engineers, and owners saw the flexibility, time savings, and cost efficiencies involved. Retail facilities, offices, even schools started to incorporate metal buildings and their components into their planning and construction. With this growth and expansion, technical issues such as snow loads and employee issues such as OSHA regulations were hot topics of research and focus.

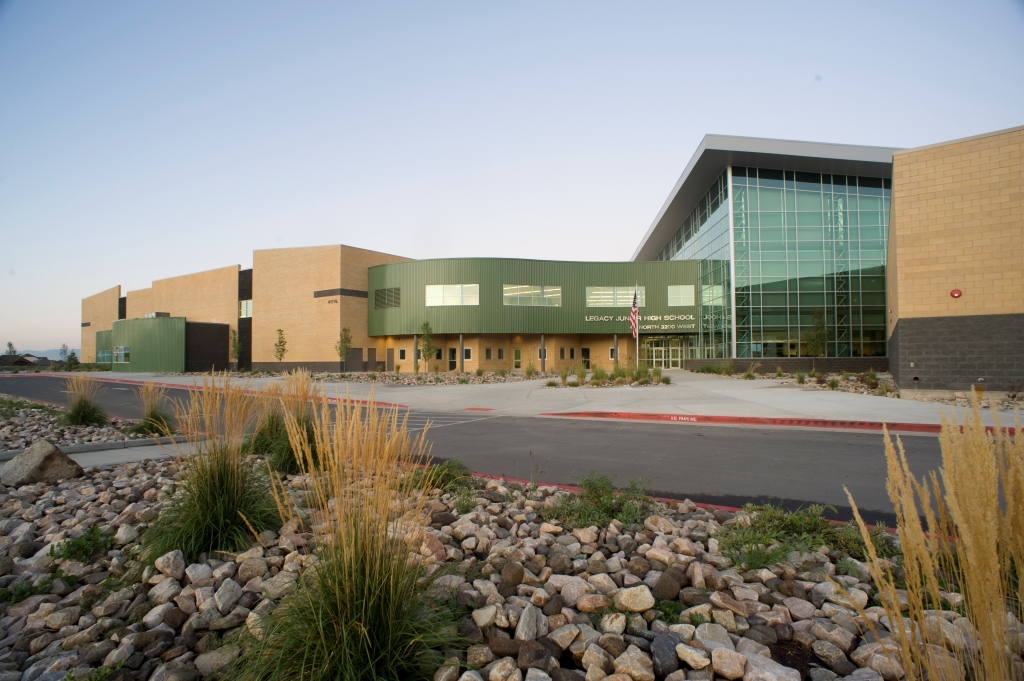
Metal Building Components featuring Legacy Junior High
Legacy Junior High School Featuring PBU Metal Panels

2000s:

With strong momentum and growing success around the country, the industry began to offer more-diverse product offerings and components. Insulated metal sandwich panels with both interior and exterior finishes became more common. New roofing finishes and appearances became available. Structural research into seismic effects on metal buildings was conducted in response to California earthquakes, and solutions were determined. Further work was done on energy performance of metal buildings in response to energy codes and customer requirements. Additional work was undertaken on updated engineering guidelines for tapered structural members and exterior wall and roof finishes and styles. This included the use of horizontal instead of vertical siding systems and smooth-surface solutions.

A Look at Today in the Metal Building Components Industry:

The metal building industry has clearly evolved and come a long way from somewhat humble beginnings. Today, full systems or components can be found in a wide range of buildings types, creating highly attractive solutions that are often not recognized as metal buildings. Continued industry research helps manufacturers provide high-quality products that meet the demands of the larger building industry. Continued collaboration and partnerships are helping to foster diversified product offerings and new market penetrations. Overall, the past 40 years or so have been just the beginning – the future of the industry looks strong, and prospects remain high for continued growth.

Roof Penetrations Made by Non-roofing Contractors

In our last two posts, we have looked at the proper ways for roofing contractors to address different types of penetrations in metal roofing in order to assure that a watertight seal is achieved from the outset, as well as over the life of the roof. But what happens when another contractor, such as a plumber, electrician, or other trade needs to penetrate the roof? How is the watertightness of the roof assured then?

Warranty Control for a Metal Roof

Most metal roofing warranties are very specific about what is included or not included should a roof leak occur. Therefore, the manufacturer’s warranty should be the first thing that is checked for a particular project to determine whether a seemingly innocent bit of work on the roof has the potential for a loss of warranty coverage. Commonly, qualified roofing contractors need to do the work and it needs to be inspected, but in some cases, supervised work may be acceptable too. Either way, any penetration installed by a trade contractor other than a roofing contractor should be fully coordinated with the architect or owner’s representative, the roofing manufacturer’s representative, the general contractor, and the roofing contractor. Once reviewed, there may be several options on how to proceed.

Guided Installation

For a single or simple penetration, say for a single small mechanical or electrical line, it may be possible to simply work with the trade contractor on the location of the penetration, review in advance that the proper materials are being used, and check the quality of the work for water tightness when complete. (Note: following the guidelines in our prior post on Pipe and Flute Penetrations will provide a good checklist of things to cover.) If everything is appropriately done, then it may be possible to have the roofing manufacturer add the new penetration to the list of items covered under the warranty.

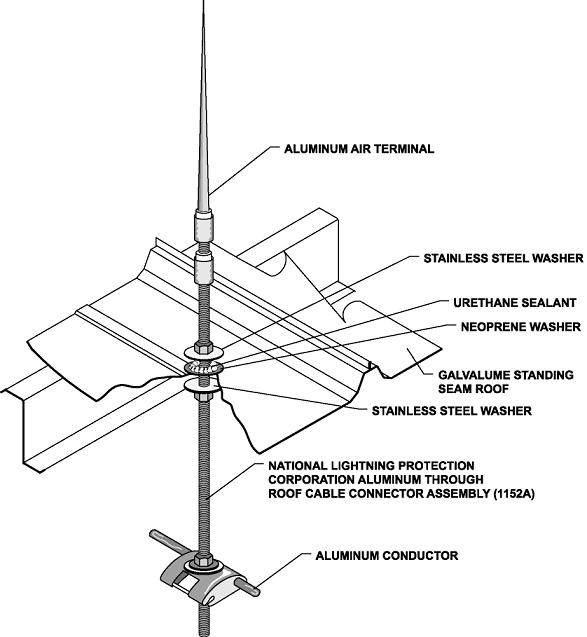
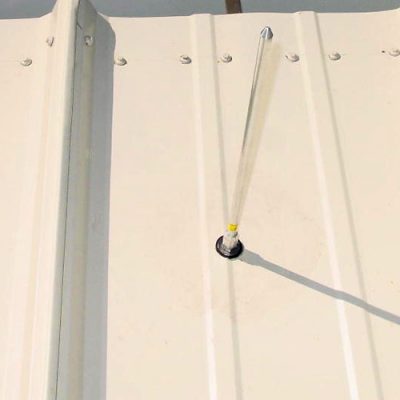
Lightning Rod
Lightning Rod Application for Metal Panels

Coordinated Installation

In some cases, numerous penetrations may be required, such as the installation of multiple lightning rods across a roof. In this case, it might be more prudent to consider a coordinated, cooperative effort to allow each trade to do what it does best and keep the warranty in effect. Instead of an electrician being responsible for the roof penetrations and for lightning rods, let him focus on the lightning protection and wiring aspects of the work. But first, bring in a roofing contractor to advise on the proper locations of the lightning rods and to be the one responsible for the watertight seal. Location advice would include things like avoiding valleys, standing seams, or other areas that are difficult to seal or flash around. The electrician could then make the needed lightning rod penetrations in the agreed-upon locations and complete his work. Following right behind, the roofing contractor could install retrofit rubber roof jacks around the lightning rods and assure that they are sealed properly. Alternatively, the roofing contractor could make the penetration and allow the electrician to install the lightning rod, while the roofing contractor installs an appropriate rubber roof jack over or around it. Either way, the two trades need to  review the process ahead of time and be sure that everyone is on board to produce the best results for everyone involved.

Bottom Line: Think Through Penetrations

roof penetrations
Standing Seam Roof Penetration

Standing seam metal roofs have become more complex in recent years, with more and varied types of roof penetrations. This simply magnifies the need for better communication between the design professional, roof manufacturer, general contractor, roofing contractor, and any of the various trades that might be working on the roof.

When everyone takes the time to plan up front and think through their own needs and the options to get there, everyone wins. The architect/owner representative can ensure that his or her clients get a roof that will perform long-term. The roof manufacturer is able to provide expertise that has been gained over a long period of time through working with similar details on roofs all over the country. The roofing contractor can leave the project knowing that the details are long-term and will mean little chance for leak callbacks. Plus, the general contractor and the building owner can quickly resolve any arguments over which trade is responsible for repairing a roof leak.

Structural Penetrations in Standing Seam Metal Roofs

In our prior post on “Pipe Penetrations in Standing Seam Metal Roofs,” we identified important guidelines for when pipe penetrations are made to metal roofing systems, typically after the metal roofing is installed. That means an opening is cut in the metal roofing, it is properly flashed or sealed, and the penetrating member is passed through it. However, some penetrations are already in place before the roofing contractor shows up. These can be things like vertical members resting on the building structure that support a platform for HVAC equipment above the sloped roof. Or, it can be parapet wall with offsets or other conditions that are already in place. In cases like this, a different approach is needed to assure that the roof remains watertight.

Equipment Platforms for Structural Penetrations

Penetrations
Structural Penetrations in Standing Seam Metal Roofs

From the standpoint of a roofer, a structural equipment platform is a pre-existing condition. The metal roofing industry already recognizes the need to address such situations, particularly on existing buildings, by offering retrofit flashing and curb products. The same, proven approach can be used when pre-existing conditions are encountered on new buildings as well. For example, when structural posts for equipment platforms are encountered running up through the roof plane, roof jacks and curbs specifically designed for retrofit applications should be used. The retrofit roof jack, or boot, should be made out of rubber and be designed to install around the penetration, rather than over it. The boot should ideally rest on a two-piece retrofit pipe curb which can span across one or more standing seams and create a smooth, flat surface for the boot to be attached and sealed. The two-piece design allows for the pipe curb to be properly shingled on the up slope and down slope side of the roofing, thus preventing a “backwater lap,” which will leak. Trying to use only products intended for new construction on such conditions will require unwarranted field modifications or an over-reliance on caulking and sealant, all of which can be prone to problems and failure of the watertight abilities of the roofing.

Parapets

The use of parapet walls around some or all of a perimeter of a building is a common condition. However, if the building shape varies, and the parapet along with it, then there may be some rather uncommon conditions in which the roofing meets an offset or irregularly shaped parapet walls. The issue is that water coming down the sloped roof runs into the offset or other obstruction, causing a buildup of water and a potential leak. The typical approach is to provide a cricket, which is flashed into the parapet wall and diverts water away from the corner created by the offset. It is important, in this case, to be aware that standard sheet metal crickets have not proven to be effective. Instead, welded aluminum crickets and fixtures are recommended to create a truly watertight seal. Also, the welded cricket can be “shingled” into the roof to prevent “backwater laps.” The key is to provide a complete seal at the corners by welding the material, which cannot be done with sheet metal crickets.

Design Planning

The best way to address all of the structural roof penetration issues described here is with proper upfront planning. Avoiding any of these conditions would of course be ideal, and perhaps they can be designed out of some projects. However, if they’re unavoidable, then the roofing contractor and the design professionals need to review the conditions together ahead of time. This advance design planning is the best way to assure that the best, most effective detailing is employed and the proper materials are available on site.

Thermal Bow vs. Thermal Expansion: A Look at Thermal Efficiency in Insulated Metal Panels

Insulated metal panels  (IMPs), a type of lightweight factory-fabricated metal panel,  are a compelling alternative to more conventional roof panel choices. IMPs have a continuous insulating core that works together with metal skins to create a barrier against air, water vapor, and thermal conditions. One major benefit of IMPs, is their thermal efficiency, averaging R-7.0 to 7.2 per inch as compared to R-5.6 per inch for unfaced urethane board stock. Insulated metal roof panels are commonly available in thicknesses ranging from two- to six-inches which generally correlates to R-14 to 42.

Structure of IMPs

IMPs consist of two single skin metal panels and a foamed-in-place core. The foam insulation is made of non-chlorofluorocarbon (non-CFC) polyurethane foam. As an example, MBCI’s IMPs consist of closed cell structure and nominal density of 2.2 pounds per cubic foot. Its closed cell structure also prevents the foam from absorbing water.

Thermal Bow in IMPs

Thermal Efficiency of IMPs
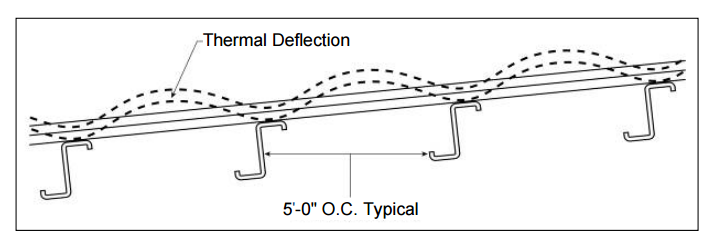
Thermal expansion of insulated metal panels is accommodated by thermal bowing.

An interesting phenomenon with IMP roof panels is that you don’t have to deal with thermal expansion the way you do with single skin panels. On wide, through-fastened roofs, you can have issues with panels slotting around the fasteners. And with standing seam roofs, you have to ensure that the panel clips can handle the anticipated thermal movement. However, insulated panels experience something called “thermal bow.”

An IMP’s exterior metal skin will still expand as it heats up. But, instead of causing the whole IMP to grow in length,  the exterior skin of the IMP will bow up slightly between purlins/joists because the interior metal skin of the IMP maintains a relatively constant temperature. The insulating foam that adheres to this metal skin flexes to allow for this bow. Because of this, thermal expansion is accommodated by the small incremental growth (and bowing up) of the exterior metal skin between each purlin/joist, which are usually spaced five to seven feet apart.

­­­­­Conclusion

Insulated metal roof panels are fixed roof systems that will experience thermal bow between the purlins as opposed to single skin systems, which are designed to allow for expansion and contraction in the panel. With its thermal efficiency benefits, IMP roofs are beginning to get noticed as an alternative for designers looking for a progressive choice to achieve flexibility and function.

Proper Care and Usage of Roof Seamers

As more standing seam metal roofs are being installed than ever before, it is imperative for roofing contractors to have the proper tools when quoting jobs. Remember, a properly formed seam is important for aesthetics, weathertightness and wind uplift. With the right tools in hand for these complex installations, you can get the job done faster, better and with greater cost efficiency than your competitors.

Know Your Type

Seamer use depends on the type of metal standing seam panels on the project: double lock seam, symmetrical seam, one-piece snap-lock interlock and two-piece snap-lock interlock. You will need to identify the type of panel in order to choose the right seamer and confirm that you are using the right seamer for the job. The double lock seam, also known as a Pittsburgh seam, is double-folded, meaning the finishing seam is 180 or 360 degrees. This applies to MBCI’s Double-Lok® and SuperLok® panels. A single-lock seam is 45 or 90 degrees, such as MBCI’s BattenLok® HS and Curved BattenLok®.

Follow Manufacturer Instructions Explicitly

Adherence to the field manual instructions is critical to ensure proper installation that will not result in damage to the seamer and/or panels. It is critical to carefully read the manufacturer’s manual thoroughly before beginning the seaming operation, whether renting or buying the equipment. Not only will this give you the best possible result, but it can also save you the headache of incurring costs of replacing or repairing the seamer due to misuse.

Step-by-Step Guide to Pre-Seaming

  1. Locate field manual in the seamer box and review operational procedures.
  2. Locate power source and check against power requirements in field manual.
  3. Check seams for proper engagement.
  4. Clean dirt, debris and excess sealant from seams and panel surfaces to avoid interfering with the seaming operation.
  5. Panels should be seamed with an electric seaming tool as panels are being installed.

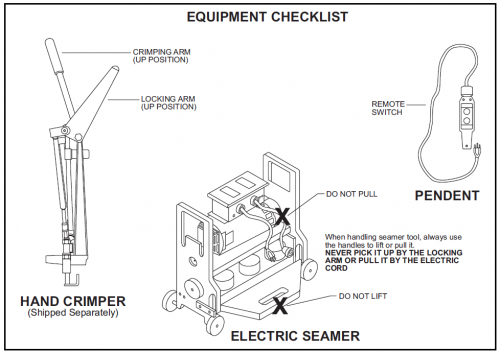
Seamer Equipment Checklist

Keys to Seaming Success

  1. The seamer should be supplied or recommended by the manufacturer. Don’t assume another manufacturer’s seamer will work on the panels you are installing. For example, other manufacturers may have a panel similar to MBCI’s BattenLok® HS but that doesn’t mean that an MBCI seamer would work on any of those panels. It is important to use the seamer recommended for the specific product. It must be the proper seam for the engineering. That is if you don’t seam it properly, the manufacturer won’t know if its load charts and tables are accurate.As previously stated, carefully read and follow seamer instructions for proper results. You will need a properly formed seam to ensure you achieve the desired aesthetics and weathertightness as well as mitigating risk from wind uplift. The seamers are miniature roll formers and need to be installed in a very specific way.
  2. Take care of the seamer—don’t leave it out in the rain or in other weather conditions where it could suffer damage.
  3. If not forming seams properly, stop immediately and call the manufacturer or company providing the seamer
  4. If renting, when returning the seamer make sure all equipment is returned, i.e. hand crimpers or hand seamers.

For more information on MBCI seamers, please review the manuals for specific panel types.

Find a sales representative